
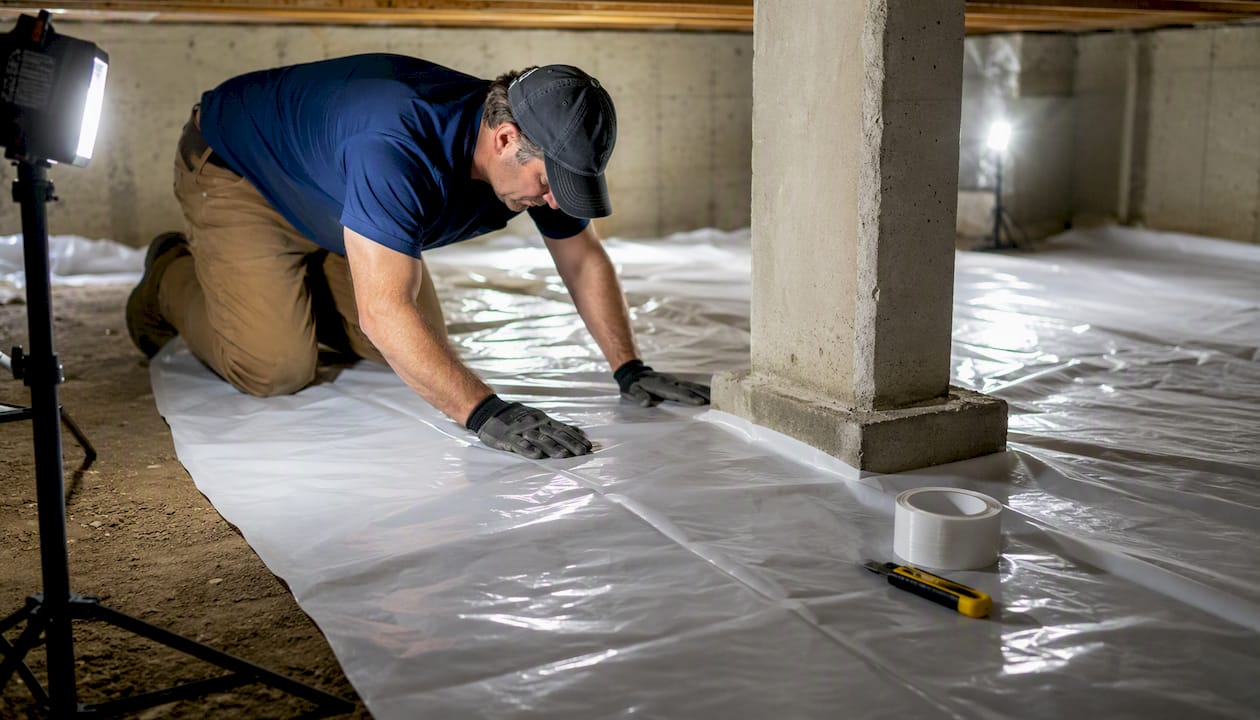
Every crawl space with exposed soil needs a ground vapor barrier. That’s not a suggestion — it’s the baseline. Bare soil releases moisture continuously, and that moisture migrates upward into floor framing, insulation, and living spaces. The minimum code standard under IRC Section R408 is 6-mil polyethylene sheeting, but in practice, 6-mil tears easily during installation and rarely survives a decade of service traffic. For most homes, especially in humid climates like the Mid-South, the better starting point is 12–20 mil reinforced or cross-laminated polyethylene. When ducts or plumbing run through the crawl space, or when you’ve already seen mold, wood staining, or high humidity readings, a full encapsulation system is the right call, not a ground-only liner.
Here’s what to do based on what you find:
- Exposed soil, no moisture problems, dry climate: Install a quality 12-mil reinforced poly ground cover with properly lapped and taped seams.
- Humid climate, summer RH above 60%, or any evidence of moisture damage: Plan for full encapsulation — ground cover plus wall coverage, sealed vents, and a dehumidifier.
- Ducts or plumbing in the crawl space: Encapsulate. Duct leakage into a humid, vented crawl space is an energy and moisture problem that a ground-only liner won’t solve.
- Active leaks, standing water, or visible wood rot: Stop. Fix drainage and structural issues before any liner goes down.
- Persistent high RH, mold at joists, or structural concerns: Call an inspector before spending money on materials.
Pro Tip: The single detail that most changes our recommendation is whether HVAC ducts run through the crawl space. If they do, a vented crawl space with only a ground liner is working against itself — warm, humid outside air condenses on cool duct surfaces and drives wood moisture up. That space needs to be conditioned and sealed, not just covered.
Key Takeaways
Every crawl space with exposed soil needs a ground vapor barrier at minimum; humid climates, duct-loaded spaces, or any evidence of moisture damage requires full encapsulation with a 12–20 mil reinforced liner and active humidity control.
| Point | Details |
|---|---|
| Code minimum vs. recommended | IRC requires 6-mil polyethylene, but 12–20 mil reinforced poly is the practical standard for durability and long-term performance. |
| Encapsulate in humid climates | Building America testing found closed crawl spaces cut HVAC energy use by 15–18% vs. vented in humid conditions. |
| Fix drainage before installing | Installing a liner over active leaks or drainage problems causes failure; complete the pre-design assessment first. |
| Installed cost range | Floor-only installations run $1,200–$4,500 installed; full encapsulation typically costs $3,000–$8,000 or more. |
| Upchurchinspection’s role | A professional crawl space inspection identifies drainage, structural, and moisture conditions that must be resolved before liner work begins. |
Table of Contents
- Which vapor barrier material should you use?
- When does a ground-only liner become a full encapsulation job?
- How to install a crawl space vapor barrier correctly
- What does vapor barrier installation actually cost?
- Inspection and maintenance checklist for your crawl space liner
- Common installation mistakes and how to spot them
- DIY or hire a pro? How to decide and vet a contractor
- What we actually find in the field
- A professional inspection reduces the risk of a costly vapor barrier project
- Sources
Which vapor barrier material should you use?
Choosing the right crawl space moisture barrier comes down to three variables: how rough the ground is, how much foot traffic the space will see during and after installation, and how long you plan to own the property. Material class matters more than most homeowners realize.
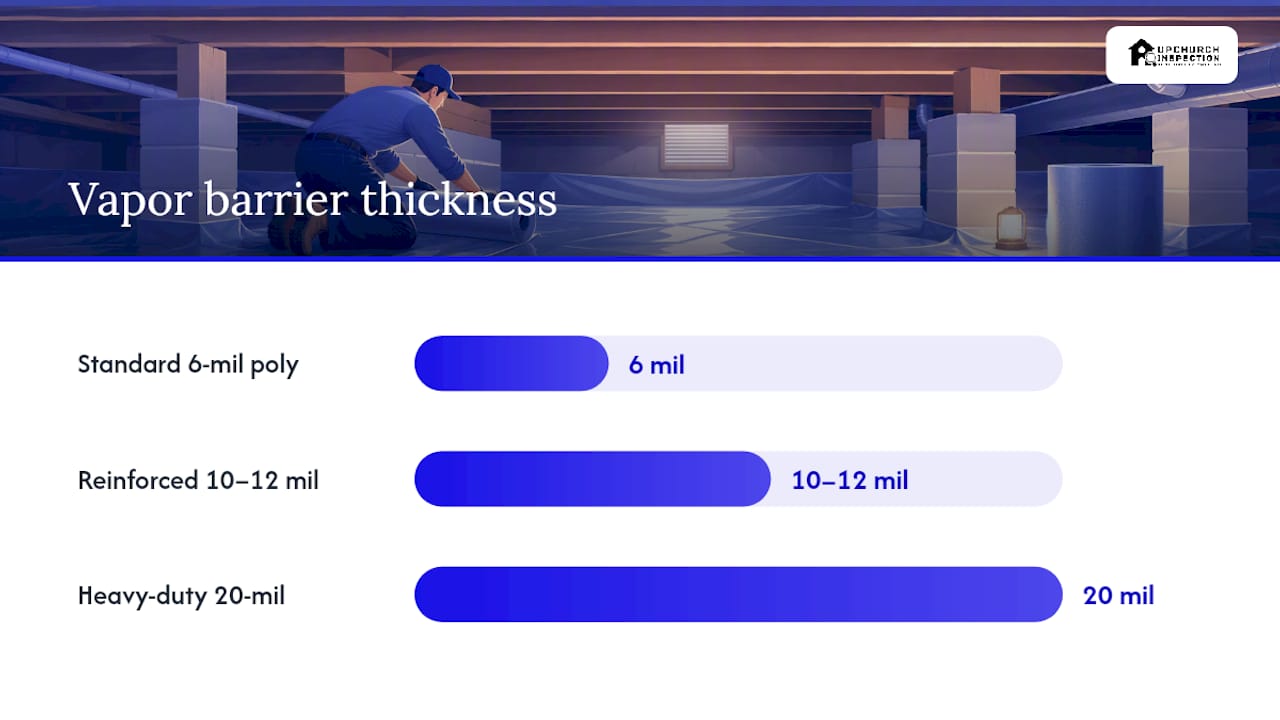
Standard 6-mil polyethylene meets the IRC code minimum for ground cover in vented crawl spaces. It’s inexpensive and widely available, but it punctures easily on rocky or uneven ground and degrades faster under UV exposure during installation. Think of it as a temporary solution or a code-compliance floor, not a long-term answer.
Reinforced polyethylene (10–12 mil) is a significant step up. The reinforcing scrim adds tear resistance, and these products handle moderate foot traffic without failing at seams. A 12-mil liner is appropriate for most floor-only installations in moderately humid conditions where the ground is relatively smooth and service access is infrequent.
Heavy-duty cross-laminated or reinforced 20-mil products — Stego Wrap and Americover are two widely used examples in this category — are the standard for full encapsulation projects. They resist puncture from gravel and debris, hold up under repeated service access, and carry longer expected service lives. ASTM E1745 is the governing standard for polyethylene ground covers; products rated to this standard are tested for tensile strength, puncture resistance, and vapor permeance. A Class A or Class B ASTM E1745 product at 20 mil is what a contractor should be installing on any full encapsulation job.
Spray-applied membranes exist as an alternative for irregular surfaces or around complex penetrations, but they’re typically a supplement to sheet goods rather than a standalone ground cover for most residential applications.
A few practical notes on handling these materials:
- Seam tape must be rated for below-grade, high-humidity conditions. Standard contractor tape fails within a season underground.
- 20-mil products are heavier and stiffer, which makes solo installation in a low crawl space genuinely difficult. Plan for a helper.
- All polyethylene liners are UV-sensitive. Don’t leave them exposed to sunlight on-site for more than a few days before installation.
- Stego Wrap and similar products come with manufacturer-specified compatible tapes. Using off-brand tape voids the seam warranty and often fails within a year.
Pro Tip: If budget is the constraint and you can’t afford full encapsulation right now, spend the money on a quality 20-mil ground cover with properly taped seams rather than a cheap 6-mil that you’ll be replacing in three years. The material cost difference on a 1,000 sq ft crawl space is a few hundred dollars. The labor cost to tear out and reinstall is not.
When does a ground-only liner become a full encapsulation job?
The short answer: when your climate, your crawl space’s mechanical systems, or what you can already see on-site tips the balance. In most of the eastern United States — and certainly across Tennessee, Arkansas, Mississippi, and the surrounding Mid-South — that condition rarely holds.
Building America field testing found that closed, conditioned crawl spaces reduced heating and cooling energy use by about 15–18% and kept wood moisture low enough to reduce mold and termite risk compared with vented crawl spaces in humid climates. That’s a meaningful performance difference, not a marginal one. The mechanism is straightforward: in a vented crawl space during a humid summer, outside air enters through foundation vents, cools against the ground and framing, and deposits moisture. A sealed, conditioned system stops that cycle entirely.
IRC Section R408.3 permits unvented crawl spaces when the ground surface is covered with a continuous Class I vapor retarder, with joints lapped at least 6 inches and sealed, and the retarder run up and attached to the foundation wall. This is the code pathway for conditioned crawl spaces — it’s not a workaround, it’s the intended design. Minimum code still requires 6-mil polyethylene, but the installation requirements (continuous coverage, sealed seams, wall run-up) are what make the system work.
Use this decision rule for on-site conditions:
- Encapsulate when: summer RH in your area frequently exceeds 60%; ducts or plumbing run through the crawl space; you’ve found mold on joists or subfloor; there’s a history of standing water; or the space has a musty odor that persists after dry weather.
- Ground-only may be sufficient when: the climate is genuinely dry (climate zones 5B, 6B, 7, or 8); no mechanical systems run through the space; and there’s no history of moisture problems.
- Escalate to a specialist when: you find active wood decay, structural damage, or measured wood moisture content above 19% — these require remediation before any liner work.
For homeowners in West Tennessee and the broader Mid-South, the vented crawl space failure pattern is well-documented. High summer dew points mean vented crawl spaces in this region are almost always working against themselves from June through September. If you have ducts down there, the energy and moisture case for encapsulation is hard to argue against.
How to install a crawl space vapor barrier correctly
Installation quality determines whether a liner lasts 5 years or 25. The most common failure mode we see isn’t material choice — it’s skipped prep steps and unsealed seams. Follow this sequence.
Before any material goes down, complete the pre-design assessment. Building America retrofit guidance calls this a pre-design assessment (PDA): document drainage conditions, vent configuration, mechanical locations, and any active moisture sources. Fix what needs fixing first.
Pre-installation checklist:
- Remove all debris, wood scraps, and sharp objects from the ground surface.
- Correct exterior grading and downspout discharge so water flows away from the foundation.
- Inspect for active leaks at plumbing penetrations and foundation walls — seal or repair before proceeding.
- Check for mold or wood rot at joists and sill plates. If present, remediate before installing the liner.
- Confirm the sump pit or crock pit condition and lid integrity.
- Grade the ground surface toward the low point or drain if possible.
Installation sequence:
- Lay out the material. Start at the far end of the crawl space and work toward the access point. Orient sheets so seams run perpendicular to the direction of travel.
- Overlap seams. The DOE job aid specifies a minimum 6-inch overlap at seams; 12 inches is better practice and what most manufacturers require for warranty compliance. Lap upslope over downslope (reverse-shingle method) so any condensate runs under rather than into the seam.
- Tape all seams. Use seam tape rated for below-grade, high-humidity conditions. Press firmly and run a hand along the full length of each seam to seat the adhesive.
- Fasten to the ground. Use landscape pins or mechanical fasteners every 2–3 feet along seams and at the perimeter to prevent the liner from shifting.
- Run up walls and piers. Extend the liner 4–12 inches up foundation walls and wrap piers completely. The DOE job aid specifies extending the retarder up walls and sealing it to the foundation.
- Seal to the foundation. Use termination bars to mechanically fasten the liner to the wall, then seal the top edge with mesh tape and mastic. This prevents capillary wicking behind the liner.
- Seal around penetrations. Pipes, columns, and conduit penetrations need to be wrapped and sealed with mastic or compatible caulk. Gaps here are where moisture re-enters.
- Terminate at the sump pit. Run the liner to the sump lid and seal the perimeter with mastic. The lid itself should be sealed and gasketed. An open sump pit in an otherwise sealed crawl space defeats the system.
- Leave a termite inspection strip if required. Some local codes require a 3-inch gap at the top of the wall run-up so pest inspectors can check for termite tubes. Confirm your local requirement before sealing all the way to the top plate.
Tools and consumables needed: utility knife, seam tape (below-grade rated), mastic/caulk, termination bars, landscape pins or mechanical fasteners, mesh tape, and a tape measure. PPE: knee pads, Tyvek suit or disposable coveralls, N95 respirator, safety glasses, and gloves. Crawl spaces are confined spaces — never work alone, and know your exit path before you start.
Pro Tip: Manufacturer detail drawings for pier wrapping and termination bar installation are worth printing and taking into the crawl space. Stego Wrap and Americover both publish these. The details look simple on paper but are easy to shortcut in a tight space — having the drawing in front of you keeps the installation honest.
What does vapor barrier installation actually cost?
Realistic cost expectations depend on scope, material grade, and whether you’re doing the work yourself or hiring a contractor. Installed cost estimates for a floor-only vapor barrier installation run from roughly $1,200–$4,500 depending on crawl space size, access difficulty, and material thickness. Full encapsulation — ground cover plus wall coverage, sealed vents, and dehumidification — typically runs $3,000–$8,000 or more for most residential crawl spaces.
The major cost drivers beyond material are crawl height (anything under 24 inches adds labor time significantly), debris removal, wall run-up and pier wrapping labor, drainage work, and dehumidifier installation. A crawl space that needs drainage correction before the liner goes down can add $1,000–$3,000 to the project before a single sheet of poly is unrolled.
The lifecycle math on material grade is straightforward. A 6-mil liner at $1,500 installed that needs replacement in 7 years costs more over 20 years than a 20-mil liner at $3,500 installed once. That’s before accounting for the labor cost of a second installation and any moisture damage that occurs if the liner fails and goes unnoticed for a season.
Pro Tip: If the full encapsulation budget isn’t there right now, phase the project. Install a quality 20-mil ground cover with properly sealed seams first — that addresses the primary moisture source. Add wall coverage and a dehumidifier in the next budget cycle. A well-installed ground cover is a real improvement; a cheap one that fails in three years is money spent twice.
Inspection and maintenance checklist for your crawl space liner
A vapor barrier isn’t a set-it-and-forget-it installation. Liners fail at seams, get torn during service access, and can hide moisture problems that develop behind them if drainage conditions change. Here’s what to check and when.
A licensed inspector’s report on a crawl space vapor barrier should document: material type and estimated thickness, seam method (taped vs. untaped), wall run-up measurement, sump termination status, any observed tears or pooling, wood moisture readings at representative joist locations, and a prioritized repair list. If a report doesn’t include these items, it’s not a complete crawl space assessment.
Immediate inspection priorities (check these now if you haven’t recently):
- Visible tears, punctures, or displaced sections of liner
- Seam failures — look for lifted tape edges or separated overlaps
- Unsealed penetrations around pipes, columns, and conduit
- Standing water or pooling on top of the liner
- Musty odor, visible mold at joists or subfloor, or white mineral deposits (efflorescence) on foundation walls
- Wood moisture readings above 16% at sill plates or joists (above 19% indicates active decay risk)
- Duct condition — disconnected flex duct in a crawl space is both an energy and moisture problem
Ongoing maintenance schedule:
- Annual visual inspection, ideally in late spring before peak humidity season
- Humidity monitoring in sealed crawl spaces — target 45–55% RH; readings consistently above 60% indicate the dehumidifier is undersized or failing
- Inspect after major storms, plumbing repairs, or any service work that required crawl space access
- Check sump pit lid seal and pump operation annually
When to call a specialist:
- Persistent RH above 60% despite a functioning dehumidifier
- Wood rot or structural damage at sill plates, joists, or posts
- Active termite activity or evidence of past infestation
- Large-scale mold growth (more than 10 sq ft) — this requires professional remediation, not just liner repair
For crawlspace moisture issues common in West Tennessee, the annual inspection timing matters. High summer dew points mean problems that develop in July may not be visible until fall when you finally open the access hatch. Don’t wait until you smell something.
Common installation mistakes and how to spot them
Most vapor barrier failures we see in the field trace back to a handful of repeatable mistakes. Knowing what they look like helps you catch problems early, whether you’re evaluating your own work or reviewing a contractor’s installation.
The most common mistakes:
- Using 6-mil poly for a full encapsulation project. It tears during installation on rough ground, and seams fail within a few seasonal cycles.
- Insufficient seam overlap — anything less than 6 inches is a failure point. Untaped seams are worse; they’re just two sheets lying next to each other.
- Not sealing to piers and sump pits. A liner that stops at the base of a pier or leaves the sump lid open is not a sealed system.
- Leaving foundation vents open after installing a new ground cover. Vented crawl spaces with ground liners still pull in humid air — the liner only addresses soil moisture, not air infiltration.
- Installing the liner over active drainage problems. Water will find its way under the liner and pool there, invisible until the damage is done.
How failure shows up:
- Pooling water on top of the liner after rain — indicates the liner is trapping water that entered through walls or vents, or that drainage under the liner is failing.
- Rippled or floating liner sections — air movement under the liner from open vents or gaps at the perimeter.
- Tape seams lifting at edges within the first year — wrong tape product, or tape applied to a damp or dusty surface.
- Mold at joists within 1–2 years of installation — the liner may be intact but the crawl space is still exchanging humid air through open vents or gaps.
Quick fixes and interim actions:
- Patch tears with rated seam tape and mastic; clean and dry the surface before applying.
- Add landscape pins every 12 inches along any section that has shifted or lifted.
- Temporarily seal sump lids with foam backer rod and mastic until a proper gasketed lid can be installed.
- Close foundation vents manually if you’ve installed a ground cover and are seeing condensation — but understand that a properly sealed system needs mechanical ventilation or conditioning to replace the air exchange those vents were providing.
For examples of what poor encapsulation practice looks like in practice, the sealed crawlspace failures documented in Franklin and Brentwood are instructive — the pattern of sealing the space without addressing humidity control is a recurring problem across the region.
Pro Tip: Red-flag failures that need professional attention immediately: any evidence of structural wood decay (soft, discolored, or crumbling wood at sill plates or posts), or a crawl space that has flooded repeatedly. These aren’t liner problems — they’re drainage and structural problems that a liner cannot fix and will hide.
DIY or hire a pro? How to decide and vet a contractor
The honest answer is that floor-only vapor barrier installation on a clean, dry, accessible crawl space is within reach for a competent DIYer. Full encapsulation — wall coverage, sealed vents, drainage work, and dehumidification — is a different project entirely and usually warrants professional installation.
When DIY is reasonable:
- Crawl height of 24 inches or more with clear access
- Floor-only ground cover replacement or first-time installation
- No active moisture problems, no mold, no structural concerns
- Dry or moderate climate with no ducts in the crawl space
- Homeowner is comfortable with confined-space work and has a helper
When to hire a professional:
- Full encapsulation with wall coverage, vent sealing, and dehumidifier installation
- Any crawl space with drainage problems, standing water history, or active leaks
- Mold remediation required before or alongside liner installation
- Structural damage at sill plates, posts, or joists
- Older homes (1960s–1970s) where plumbing and structural conditions may complicate the scope
| Scenario | DIY Reasonable? | Hire a Pro? |
|---|---|---|
| Small, dry crawl space, floor-only liner | Yes | Optional |
| Humid climate, no ducts, no moisture history | Possible with 12–20 mil | Recommended |
| Ducts in crawl space, full encapsulation needed | No | Yes |
| Active moisture, mold, or drainage issues | No | Yes |
| Structural damage present | No | Yes — plus engineer evaluation |
Contractor interview checklist:
- Ask for the specific material they plan to install: mil thickness, brand, and ASTM E1745 compliance. A contractor who can’t answer this question specifically is a red flag.
- Confirm the scope includes wall run-up measurement, sump pit termination, and pier wrapping — not just ground coverage.
- Ask whether they perform humidity testing before and after installation and whether they provide post-install verification.
- Request references from similar projects completed in the past 12 months.
- Ask about the warranty: what it covers, for how long, and whether it’s backed by the manufacturer or just the contractor.
Red-flag answers: A price-only quote with no site inspection. Refusal to specify materials or show product data sheets. No written warranty. A contractor who recommends closing vents without adding humidity control. Any bid that doesn’t include a walk-through of the crawl space before pricing.
What we actually find in the field
We inspect crawl spaces across Tennessee, Arkansas, Mississippi, Missouri, and Kentucky, and the failure patterns repeat with enough consistency that they’re worth naming plainly.
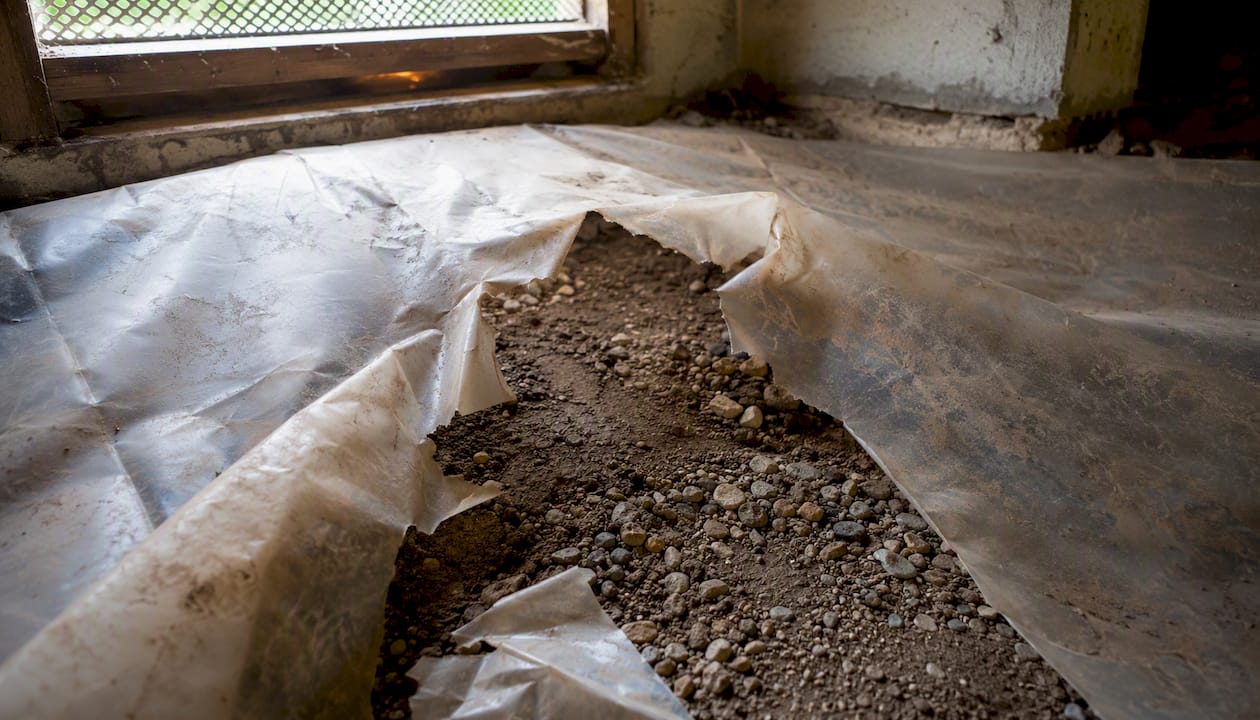
The most common finding isn’t a catastrophic failure — it’s a liner that was installed reasonably well but has been degraded by years of service access. Access paths through a crawl space turn into tear zones. Every HVAC service call, every plumber who crawls through to reach a drain, every pest control technician — they all walk on the liner. A 6-mil product in a space that sees annual service traffic is shredded within five years. We document this regularly: torn sections at the access point and along the main travel path, with intact liner everywhere else. The fix is straightforward, but the homeowner usually didn’t know it was happening.
The second pattern is sealed sump pits that aren’t actually sealed. The liner terminates at the sump lid, but the lid itself is unsealed, cracked, or missing a gasket. In a conditioned crawl space, an open sump is essentially an open hole to the ground — it defeats the humidity control entirely. We note this in every report where it applies, and it comes up more often than it should.
Regional note for Memphis and West Tennessee: summer relative humidity here is genuinely punishing. Dew points above 70°F are common from June through August, and a vented crawl space during that period is pulling in air that is nearly saturated. If you have a vented crawl space with only a ground liner, that liner is doing useful work — but it’s not enough. The common issues we find in West Tennessee crawlspace homes almost always include elevated wood moisture at joists, even when a ground liner is present, because the liner addresses soil moisture but not the humid air entering through vents. Encapsulation with active humidity control is the right answer for this climate, and the dehumidification standard for the Delta region reflects that directly.
Taped seams that fail after seasonal cycles are the third pattern. The crawl space goes through temperature and humidity swings that stress adhesive bonds. Tape applied to a slightly damp or dusty surface during installation may hold for a year and then peel. We see this most often at wall run-up terminations and around penetrations — exactly the spots where a seam failure allows the most moisture intrusion.
A professional inspection reduces the risk of a costly vapor barrier project
Before you spend money on materials or hire a contractor, an inspection tells you what you’re actually dealing with. That matters because the scope of a vapor barrier project can change significantly based on what’s already happening in the crawl space. A homeowner who installs a 20-mil liner over an active drainage problem has spent money on materials and labor that will fail. An inspection identifies those conditions first.
Upchurchinspection’s crawl space assessments cover moisture mapping, humidity logging, duct leakage evaluation, structural moisture readings at joists and sill plates, and a prioritized repair list. That list tells you what has to be fixed before liner work begins, what can be addressed alongside it, and what to monitor afterward. The benefits of a professional inspection go beyond the crawl space itself — the same assessment documents plumbing, electrical, and structural conditions that affect the overall remediation scope and budget.
For homeowners in the Mid-South who are weighing a vapor barrier installation or full encapsulation, the inspection is the step that prevents a second project. Schedule a crawl space inspection with Upchurchinspection before the contractor quotes begin.
Sources
These are the primary sources behind the guidance in this article. Each is worth reviewing directly if you want to verify a specific claim or go deeper on a particular topic.


