
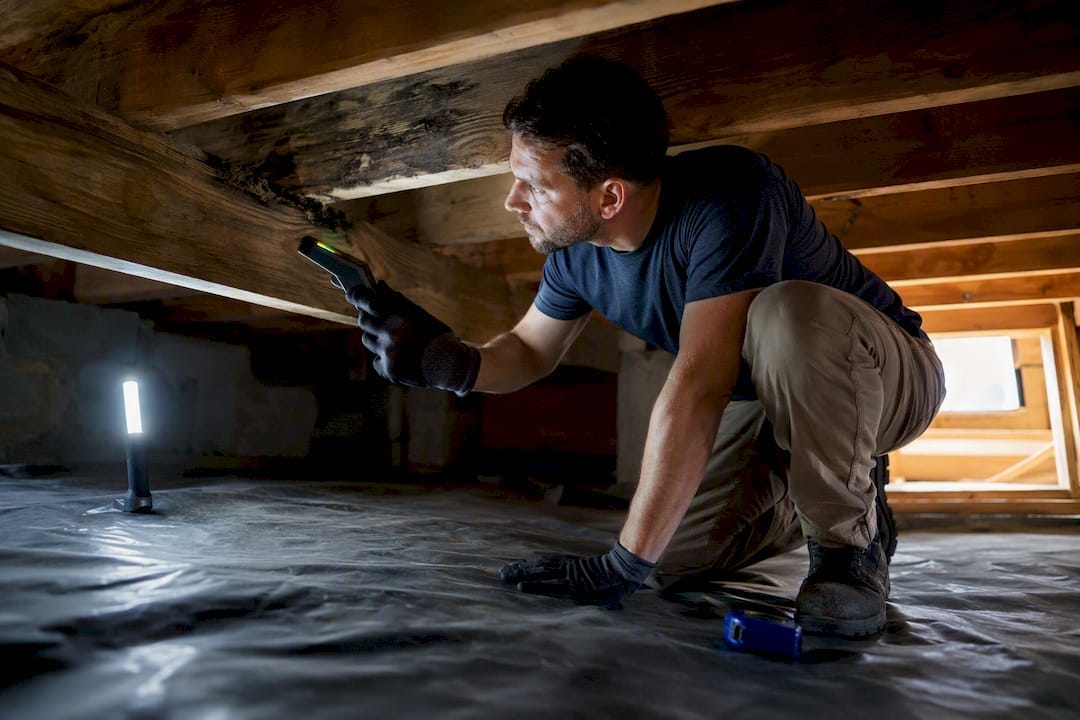
If you smell mustiness under the house, have had recent water intrusion, or see dark staining on floor joists, schedule a professional crawl space mold inspection now. A proper inspection tells you whether growth is active or historical and pinpoints the moisture source driving it, which is the only real path to fixing the problem instead of just masking it.
TL;DR:
- Moisture levels above 14% on a wood surface or cold spots in thermal imaging indicate active mold growth needing urgent remediation.
- Visual signs like staining, odors, or ongoing water issues, especially after recent leaks or flooding, warrant immediate professional inspection.
- Testing results, especially species identification, are less informative than moisture readings and visual evidence for targeted mold treatment.
- Inspection costs range from $200 to $600, with additional sampling and post-remediation testing potentially adding to the expense.
- Addressing moisture sources such as grading, vapor barriers, and humidity control is essential to prevent mold recurrence rather than solely cleaning visible growth.
Table of Contents
- When Should You Get a Crawl Space Mold Inspection?
- What Happens During a Professional Crawl Space Mold Inspection?
- Surface, Air, and Dust Sampling: What Each One Actually Tells You
- How Inspectors Tell Active Growth From Old Staining
- What Does a Crawl Space Mold Inspection Cost?
- Preventing Mold From Coming Back
- How Upchurch Inspection Supports Your Due Diligence
- Get a Crawl Space Mold Inspection From a Mid-South Team That Documents Everything
- The Real Gap Between What Mold Testing Promises and What It Delivers
- Sources
When Should You Get a Crawl Space Mold Inspection?
Some signs are obvious the moment you open the access hatch. Others show up first inside the living space, which is why homeowners often chase the wrong problem for months before someone finally checks under the house.
Watch for these indicators:
- A persistent musty or earthy smell in the crawl space or, worse, drifting up into the home through floor registers and outlets
- Dark, gray, or greenish staining on joists, subfloor, or insulation
- Standing water, damp soil, or condensation on ductwork and pipes
- Sagging or discolored insulation hanging away from the subfloor
- Unexplained allergy symptoms, coughing, or respiratory irritation that improve when occupants leave the house
Certain events should push an inspection to the top of your list rather than something you get to eventually. A recent plumbing leak, a flooded crawl space after heavy rain, HVAC condensation pooling under the unit, or a prior mold remediation you want verified are all trigger points. So is a real estate transaction with a closing deadline. If you’re buying a house in the Mid-South, where humidity and clay soils keep crawl spaces damp for much of the year, a mold check often belongs in the same conversation as the general home inspection, not as an afterthought tacked on later.
Priority matters most for two groups: households with asthma, allergies, or immune-compromised members, and buyers already under a real estate contingency clock. For the first group, EPA guidance on mold and health notes that exposure can trigger allergic reactions, asthma attacks, and irritation of the eyes, skin, nose, and throat, so waiting is a genuine health tradeoff, not just a maintenance decision. For the second, a delayed inspection can mean a delayed closing or a negotiation you enter without leverage.
What Happens During a Professional Crawl Space Mold Inspection?
A field-competent inspection follows a fairly consistent workflow, whether it’s a residential crawl space in West Tennessee or a commercial building’s substructure in Little Rock. Here’s the general sequence an inspector methodology guide lays out, and one we recognize from time spent alongside licensed inspectors real jobs:
- Safety and access screening. The inspector checks clearance height, standing water, structural hazards, and air quality concerns before entering. Some areas get documented as “not entered” rather than forced, especially where crawl height or debris makes safe access impossible.
- Vapor barrier evaluation. Coverage, seam overlap, and physical condition of the ground barrier get assessed, since a torn or missing barrier is often the single biggest moisture contributor in the space.
- Moisture mapping. Pin or pinless moisture meters take readings across multiple zones, not just one spot, because moisture rarely distributes evenly across a crawl space.
- Thermal imaging. A thermal camera flags cold spots and moisture anomalies that aren’t visible to the naked eye, particularly along rim joists and exterior wall lines.
- Visual and olfactory survey. The inspector examines joists, subfloor, insulation, and ductwork for staining or growth, and notes odor characteristics that often correlate with active versus dormant conditions.
- Photo documentation. Quadrant photos, meter readout photos at each reading point, and thermal images get logged so the report isn’t just an opinion. It’s evidence.
- Sampling decision. Only when visual and moisture findings are ambiguous, or a client specifically requests species confirmation, does the inspector move to surface, air, or dust sampling.
Pro Tip: Ask whether the inspection includes moisture readings at multiple points around the crawl space perimeter, not just near the access door. A single reading near the entrance tells you almost nothing about conditions 40 feet back near the water heater.
Surface, Air, and Dust Sampling: What Each One Actually Tells You
Sampling is a tool for answering specific questions, not a default step in every inspection. EPA guidance is direct about this: when mold growth is visible, sampling usually isn’t necessary to confirm a problem exists. Labs help confirm species or verify remediation success, not decide whether you have an issue.
Three sampling types show up in most crawl space work:
- Surface sampling (tape lifts or swabs) identifies what species is growing directly on a specific substrate, which helps a remediation contractor choose the right cleaning method for that material.
- Air sampling compares spore counts inside the crawl space against an outdoor baseline sample taken the same day. Elevated indoor counts relative to outdoor levels suggest an active source, but a single air sample is a snapshot, not a trend. Conditions can shift with weather, ventilation, and time of day.
- Dust sampling (sometimes marketed under ERMI-style protocols) reflects historical exposure accumulated over time. It’s useful for understanding past conditions but was never designed as a clearance test after remediation.
A sample that comes back positive for a common mold species doesn’t automatically mean you need a full remediation contract. EPA notes there’s no federal “safe” level of mold, which means lab results only carry weight when read alongside moisture data and visual findings, not as a standalone verdict. A species identification without a moisture reading is half an answer.
Any lab worth using should follow chain-of-custody protocols and provide a report listing the taxa identified and spore concentrations per sample, comparable against the outdoor control. If a company skips the outdoor baseline, treat the results with skepticism.

How Inspectors Tell Active Growth From Old Staining
This is where the moisture meter earns its keep. Wood framing readings above roughly the mid to high teens in percentage typically indicate active moisture capable of sustaining new growth, according to inspection methodology standards. Readings below about the low teens in percentage usually point to a dry substrate, meaning any staining present is likely historical, left over from a past event that’s since dried out. Thermal imaging adds another layer, since a cold anomaly paired with elevated moisture readings at that same spot is a strong signal of ongoing intrusion rather than an old scar.
Inspectors working within IICRC S520 condition categories classify zones based on what they find, which shapes the scope of any remediation that follows. Broadly:
- Condition 1 zones show normal ambient spore levels with no visible growth. No action needed beyond monitoring.
- Condition 2 zones show elevated spore levels or air movement from a contaminated area, often calling for source correction and targeted cleaning.
- Condition 3 zones show actual visible growth, typically requiring contained removal and professional remediation.
A report that clearly separates active from historical conditions gives you something concrete to hand a contractor for a repair quote, or to a real estate agent during negotiations. Learning to read that report correctly matters just as much as the inspection itself, since a vague summary leaves too much room for a seller’s contractor to downplay findings or a buyer’s agent to overstate them.
What Does a Crawl Space Mold Inspection Cost?
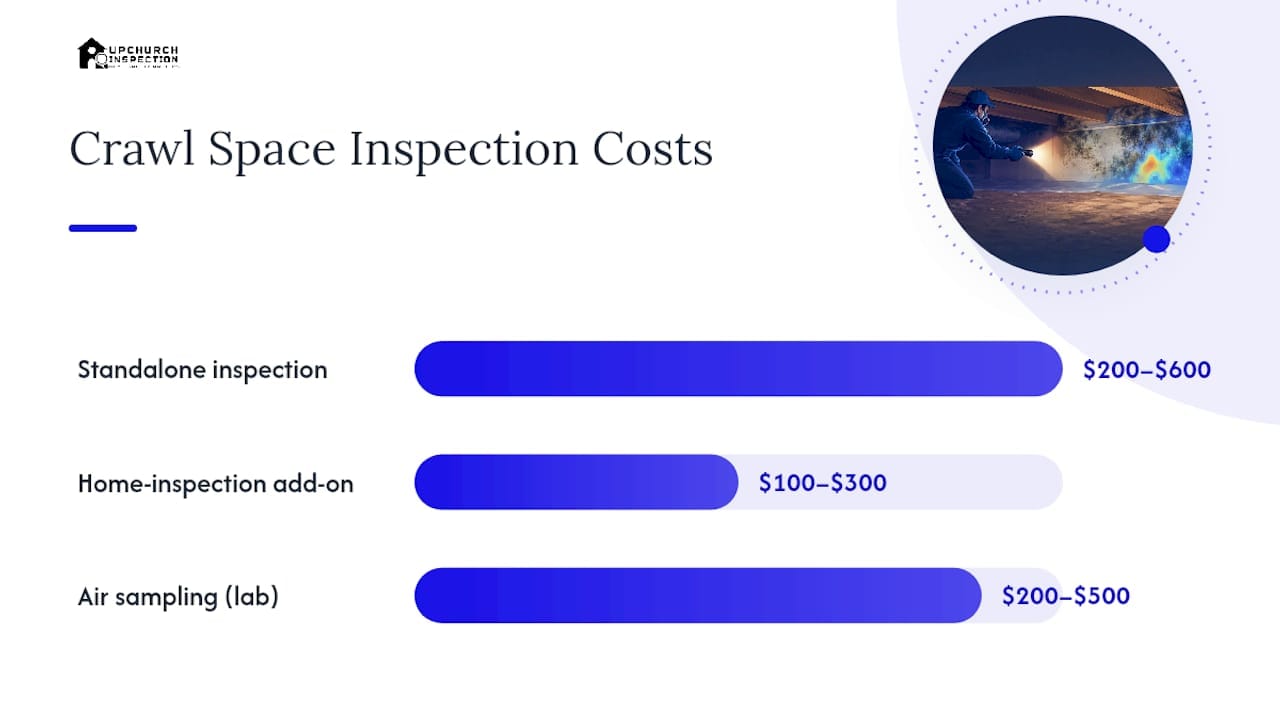
Standalone crawl space mold inspections generally run $200 to $600, while bundling one into a broader home inspection typically adds $100 to $300 to the base fee. Air sampling as an add-on runs another $200 to $500, mostly driven by lab analysis fees rather than the inspector’s time on-site.
Turnaround for lab results usually falls within a few business days for standard mold panels, though accessibility problems (tight crawl height, standing water, or hazardous conditions) can push scheduling out further. Cost drivers beyond the base fee include home size, number of sampling points, and whether the crawl space requires special safety precautions to enter safely. If remediation happens, post-work clearance testing adds its own timeline and cost, separate from the original inspection.
Preventing Mold From Coming Back
Cleaning visible mold without fixing the moisture source is a short-term patch. The EPA is explicit that moisture control, not surface cleaning, is the real fix, and that wet materials need to dry within a couple of days to prevent new colonization.
Priority fixes, roughly in order of impact:
- Correct exterior grading and extend downspouts away from the foundation
- Repair or install a properly seamed vapor barrier, and consider full encapsulation with a dehumidifier in consistently damp climates
- Add interior drainage or a sump if standing water recurs after rain
- Remove stored cardboard or fabric items from the crawl space and monitor relative humidity with an inexpensive gauge
Pro Tip: If your crawl space humidity gauge regularly reads above 60% even during dry weather, that’s a signal worth addressing before it becomes a growth problem, not after.
Call a foundation or drainage contractor when the fix involves regrading, French drains, or structural water management. Some situations go beyond a homeowner weekend project.
How Upchurch Inspection Supports Your Due Diligence
Upchurch Inspection performs crawl space and mold inspections across Tennessee, Arkansas, Mississippi, and Southeast Missouri, working alongside licensed inspectors residential and commercial jobs throughout the Mid-South. Clients receive a documented photo set, a moisture map with meter readings by location, and a clear distinction between active and historical conditions rather than a vague “mold present” summary.
For buyers, investors, and property managers, that distinction matters most when it’s time to negotiate repairs or budget for capital expenditures. An independent inspection gives every party in the transaction the same factual baseline, which reduces disputes over what deferred maintenance actually exists versus what a seller’s contractor claims is cosmetic.
Get a Crawl Space Mold Inspection From a Mid-South Team That Documents Everything
Inspection services fit homeowners buying a property with a musty crawl space, sellers who want to clear up questions before listing, and commercial investors who need moisture and mold findings tied directly to CapEx planning rather than guesswork. If you’ve read this far, you already know a real report needs moisture readings, photos, and a clear active-versus-historical call, not a checkbox that just says “mold found.”
That’s the standard our inspections are built around, whether it’s a single-family crawl space in Jonesboro or a commercial substructure in Memphis facing an investor’s due diligence deadline. For commercial buyers specifically, mold and moisture findings often connect to bigger structural or drainage questions that a general inspection alone won’t catch.
If you’re facing a closing deadline, a suspicious odor, or a property manager’s maintenance backlog, reach out to schedule an inspection and get a report you can actually act on.
The Real Gap Between What Mold Testing Promises and What It Delivers
Here’s what most articles on this topic skip: a lab report with a species name on it feels authoritative, but it often tells you less than a good moisture meter does. I’ve seen plenty of situations where a homeowner fixated on whether a sample came back as Aspergillus or Cladosporium, when the actual decision that mattered was whether the reading at that joist was 14% or 22%. Species identification satisfies curiosity. Moisture data drives the repair scope.
The industry’s own sampling guidance backs this up, since neither the EPA nor most credible inspection standards treat a positive sample as the trigger for remediation. The moisture source is the trigger. That’s a harder message to sell than “we tested for mold,” because it means the real value of an inspection is diagnostic legwork under the house, not a lab slip you can wave around. Buyers who understand that distinction negotiate from a stronger position, and property managers who build maintenance plans around moisture control instead of reactive mold cleanups spend less money over five years, not more.
— Holly
This article is general information, not a substitute for advice from a qualified doctor. Consult a qualified healthcare professional about your own circumstances before acting on anything here.

## Sources
- [Molds and health — U.S. EPA](https://www.epa.gov/mold/molds-and-health-public-health-professionals)
- [Crawlspace Mold Inspection: An inspector methodology guide — InspectandTest](https://inspectandtest.net/guides/crawlspace-mold-inspection/)


