
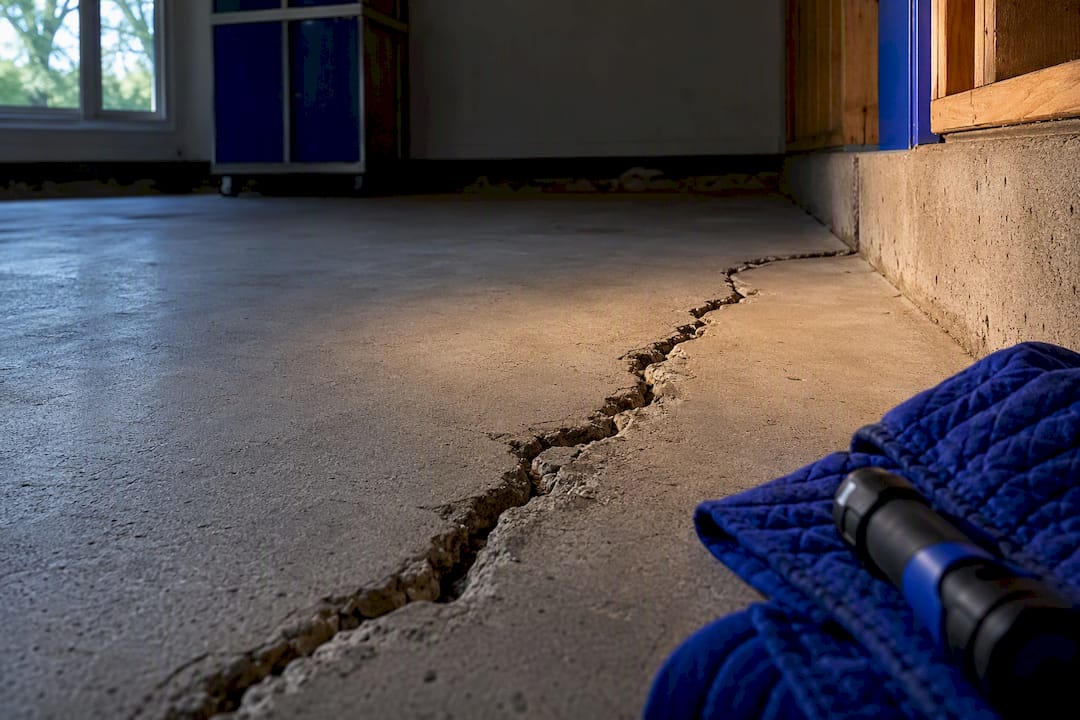
Most cracks you see in a slab are shrinkage cracks, and they’re safe to monitor rather than panic over. Cracks that show displacement, active growth, or run in a single directional path are a different animal and warrant a professional look. Document what you see, control water around the foundation, and start a monthly monitoring routine. If you spot any offset across the crack or it’s paired with sticking doors or new wall cracks, get it evaluated before you do anything else.
TL;DR:
- Most shrinkage cracks are cosmetic and safe to monitor unless they show displacement, growth, or run in a single direction, which indicates potential structural issues.
- Cracks wider than 1/8 inch with displacement or that run through the full thickness of the slab require professional evaluation, especially if paired with other signs like sticking doors or sloping floors.
- Foundation cracks caused by water-related issues, such as poor drainage or seasonal soil expansion, are common and usually fixable through moisture control, not urgent repair.
- Conducting regular documentation, including photographs, measurements, and water management actions, helps track crack progression and prepares you for a timely professional assessment.
- Call an engineer instead of a contractor when cracks show displacement, active widening, or when multiple symptoms like drywall cracking and floor sloping appear, to ensure accurate diagnosis and appropriate repair options.
Table of Contents
- How Serious Is This Slab Foundation Crack? A Field Checklist
- What Causes Cracks in a Concrete Slab?
- What to Do Right Now if You Find a Crack
- Who Do You Call: Inspector, Engineer, or Contractor?
- Foundation Crack Repair: Methods and What They Actually Cost
- Preventing Foundation Cracks: Grading and Drainage Basics
- What Inspectors See That Homeowners Miss
- Book a Foundation Evaluation With Upchurch Inspection
- Sources
How Serious Is This Slab Foundation Crack? A Field Checklist
I’ve walked slabs where the homeowner was ready to call in a structural engineer over a crack that was pure shrinkage, and I’ve seen sellers dismiss a crack that turned out to need underpinning. The difference almost never comes down to gut feeling. It comes down to pattern, width, displacement, and location, checked in that order.
Pattern first. A web or map pattern, cracks branching off in multiple directions like a dry lakebed, is the signature of shrinkage. It’s cosmetic in the overwhelming majority of cases. A single crack running in one direction, especially diagonal or stair step through masonry, behaves differently and deserves closer attention.
Width second. Here’s the rule of thumb I use on every inspection:
- Very thin hairline cracks are almost always cosmetic
- Moderate width cracks are worth tracking but not immediately alarming
- Widely open cracks or any cracks with displacement require professional evaluation
Pro Tip: A crack that measures 1/8 inch wide but shows zero displacement is a very different animal than a hairline crack with a visible step. Width alone doesn’t tell the whole story.
Displacement is the tell that outranks everything else. If one side of the crack has shifted up, down, or laterally relative to the other, even a hairline-thin crack, that’s a structural indicator you shouldn’t ignore. Run a straightedge across the crack and see if it rocks or catches on one side.
Check depth and continuity too. A surface-only craze crack in the top skin of concrete is a finishing issue, not a slab problem. A crack that runs through the full thickness of the slab, or continues into the perimeter beam or footing, is a different conversation entirely, and pattern and displacement together are what separate structural cracks from cosmetic ones, with structural cracks often exceeding 1/4 inch.
Location matters, too. A crack near a load-bearing point, under a column, or aligned with a perimeter beam carries more weight (literally) than the same crack in the middle of a garage slab. If it shows up alongside sticking doors, new drywall cracks, or a floor that feels slightly out of level, those secondary symptoms often surface before the crack itself becomes obvious.
What Causes Cracks in a Concrete Slab?
Concrete cracks. That’s not a defect, it’s chemistry. Understanding which mechanism produced the crack in front of you tells you a lot about whether it’s a maintenance note or a red flag.
- Shrinkage and curing stress: Concrete loses moisture as it cures and contracts. Restraint against that shrinkage is the single most common cause of cracking, which is why builders cut control joints, to make the concrete crack where they want it to instead of randomly.
- Differential settlement or poor compaction: When soil under one part of the slab compresses more than the rest, usually because it wasn’t compacted properly before the pour, the slab cracks along a single line and can show real displacement.
- Expansive clay soils and seasonal moisture swings: West Tennessee clay swells when wet and shrinks when dry. That cycle puts steady, repeating stress on a slab, and it’s a big reason foundation issues here often show up seasonally rather than all at once.
- Rebar corrosion or a weak concrete mix: Corroding reinforcement expands and can crack and spall the surface above it, usually visible as rust staining bleeding through the crack.
- Post-tension slabs need extra caution. If you see circular caps at the slab edge, that’s very likely a post-tensioned slab with cables under serious tension. Never drill, cut, or core into one without confirming the slab type first. Severing a tendon can cause sudden, violent movement.
What to Do Right Now if You Find a Crack
Before you call anyone, spend fifteen minutes doing this. It costs nothing and it gives whoever you eventually hire something real to work with.
- Photograph it with a date stamp and lay a coin or tape measure in frame so width is obvious later.
- Mark the ends of the crack with a pencil line or a small piece of tape so you’ll notice if it grows.
- Measure the width at two or three points and write the numbers down with the date.
- Check for step height with a straightedge laid flat across the crack. Any offset, even small, is worth recording.
- Control water near the slab. Fix leaking downspouts, regrade low spots, and stop irrigation heads from spraying toward the foundation. If it’s an active leak, a temporary seal is fine; don’t seal a dry, stable crack just to make it disappear from view.
Pro Tip: Keep your measurements in one place, phone notes, a notebook, whatever, dated every time. When you eventually talk to an inspector or engineer, a two-month log beats a vague “it seems bigger” every time.
Escalate immediately if the width visibly increases, new displacement appears, or you start noticing doors that stick, new drywall cracks, or a floor that feels tilted underfoot.
Who Do You Call: Inspector, Engineer, or Contractor?
These three roles get mixed up constantly, and hiring the wrong one wastes money and time.
A home inspector’s job is screening. During a general inspection, we’re looking at the whole house, foundation included, and flagging anything that doesn’t look normal for further review. We don’t write structural repair specifications, and a good inspector will tell you that directly instead of guessing.
A structural engineer provides the actual diagnostic opinion, tests if needed, and a written repair specification a contractor can bid against. This is the deliverable you want in hand before you sign a repair contract for anything beyond a cosmetic patch.
A contractor executes the repair once you know what’s actually wrong. Hiring a repair contractor before you have an engineer’s opinion, when the crack shows real structural signs, means you’re trusting their diagnosis and their invoice at the same time. That’s a conflict of interest built right into the transaction.
- Call an engineer when: you see displacement, the crack is actively widening, or you’re seeing multiple clues together (sticking doors, sloping floors, cracked drywall).
- Cost expectations: general foundation inspections often run $300 to $3,000 depending on size and scope, with a typical buyer’s evaluation landing closer to $600. Full engineering assessments cost more, especially if soil testing is involved.
- Bring your monitoring log, photos, and any history of plumbing leaks under slabs or drainage problems to the visit. It speeds up the diagnosis considerably.
- If you’re in a real estate transaction, many lenders and buyers require a written engineer’s report before closing on a home with known foundation movement.
Foundation Crack Repair: Methods and What They Actually Cost
Repair cost varies enormously because “fix the crack” can mean five different things depending on what’s actually wrong underneath it.
- Routing and sealing: cuts a small channel along the crack and fills it with a flexible sealant. This is a water-control and cosmetic fix, not a structural repair, and it’s the cheapest option by far.
- Epoxy injection: bonds the two sides of a crack back together and can restore some structural continuity, but only makes sense on a crack that’s dry, stable, and specified by an engineer. Injecting epoxy into an actively moving crack is a waste of material.
- Mudjacking or slabjacking: pumps material under a settled slab section to raise it back closer to level. Useful for sunken slab sections, not for a slab that’s cracking due to soil expansion rather than settlement.
- Helical piers or push piers: transfer the load of a settling foundation down to stable soil or bedrock. This is the go-to for genuine load-bearing settlement, and it costs considerably more than surface repairs.
- Underpinning or partial slab replacement: reserved for severe failure. Highest cost, most disruption, and usually only recommended after an engineer has ruled out simpler fixes.
None of these repairs hold up long term if you don’t fix what caused the movement in the first place. Repairs that skip root-cause remediation, drainage and soil moisture control especially, tend to fail again within a few years. Fix the water problem, then fix the crack, not the other way around.
Preventing Foundation Cracks: Grading and Drainage Basics
Most of the slab problems I see trace back to water, not bad concrete. A few habits go a long way toward keeping soil movement, and the cracking it causes, under control.
- Grade the soil around your foundation to slope away at a minimum of 6 inches of drop over the first 10 feet. Flat or reverse-sloped grading is one of the most common causes of slab movement I find on inspections.
- Extend downspouts 4 to 6 feet away from the foundation and clean gutters at least twice a year. A clogged gutter dumping water at one corner of the house year after year will move soil.
- Limit irrigation near the slab and redirect sprinkler heads away from the foundation line.
- Walk your hardscape after a hard rain. Patios, walkways, and mulch beds that funnel water toward the house undo good grading fast.
- Do a seasonal walk-around each spring and fall and jot down anything new, even if it seems minor.
Pro Tip: If you only do one thing this year, fix your downspouts. It’s the cheapest, fastest change that actually reduces soil movement around a slab.
What Inspectors See That Homeowners Miss
Most of what worries homeowners is harmless, and most of what should worry them gets waved off as “just settling.” Hairline shrinkage cracks with no displacement are almost never the problem. What actually matters is progression and whether the rest of the house agrees with the crack’s story.
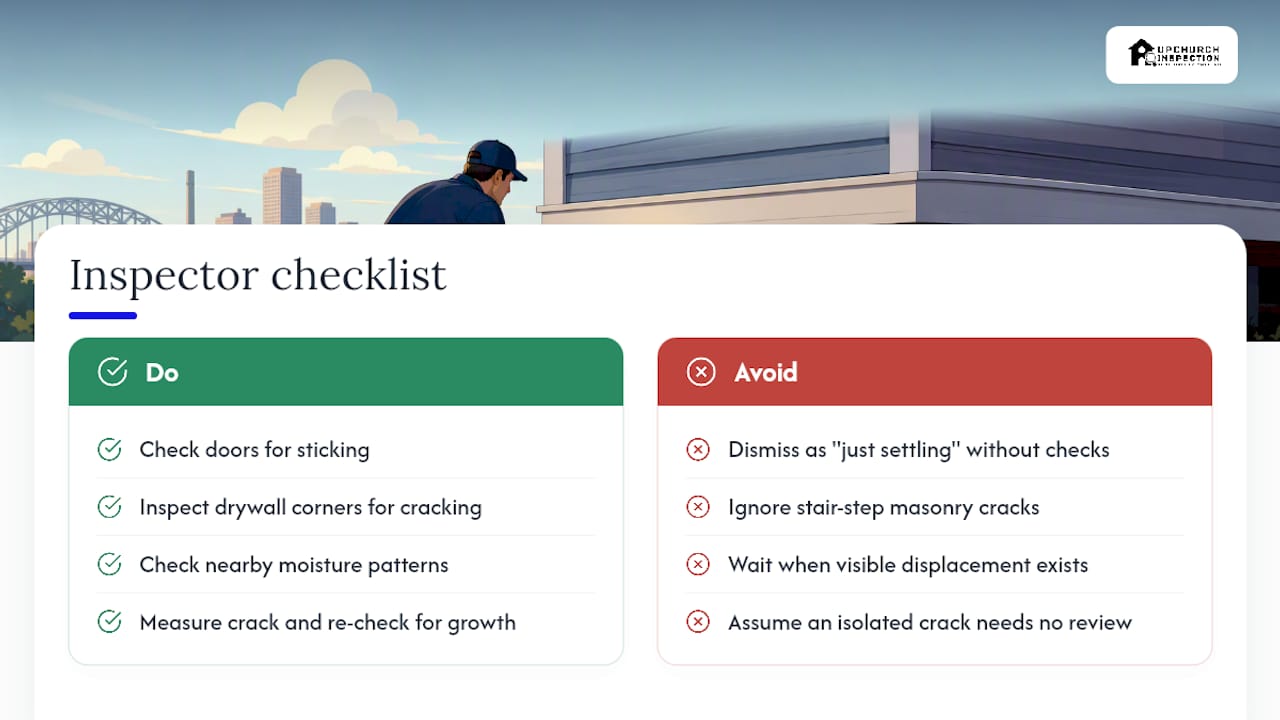
We don’t just look at the crack. We check doors for sticking, drywall corners for cracking, and moisture patterns nearby, because a slab rarely fails in isolation. If the crack is alone and stable, it’s probably fine. If it’s got company, treat it seriously.
Red flags for immediate escalation: any visible displacement, a crack that’s grown since you last measured it, stair-step cracking in masonry, or a slab crack paired with new drywall cracks or doors that suddenly won’t latch. Any one of those is worth a call, not a wait-and-see.
— Holly
Book a Foundation Evaluation With Upchurch Inspection
Upchurch Inspection gives Memphis and West Tennessee homeowners something a lot of foundation companies quoting free repairs can’t: an independent read on your slab before anyone’s trying to sell you a fix. We don’t do the repair work, so there’s no incentive to find more than what’s actually there. A standard inspection covers the slab, perimeter, and the secondary clues, drywall, doors, drainage, that tell the real story, and when a crack crosses into structural territory, we can point you toward an engineer’s foundation evaluation for a formal diagnostic opinion before you sign any repair contract.
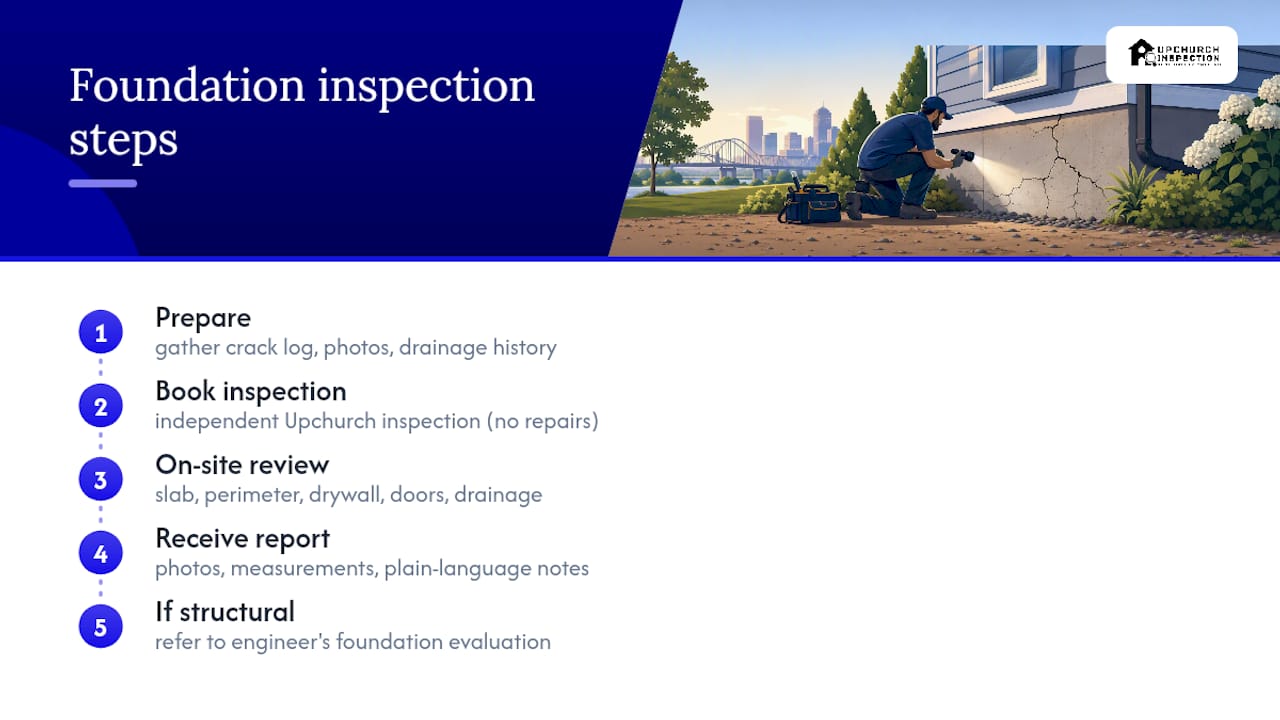
Your report comes with clear photos, measurements, and plain-language notes you can hand straight to an engineer, a buyer, or a real estate agent. Before you book, pull together your crack log, photos, and any drainage history you’ve got. Ready to get a straight answer on that crack? Schedule a structural or engineer’s evaluation and find out what you’re actually dealing with.


