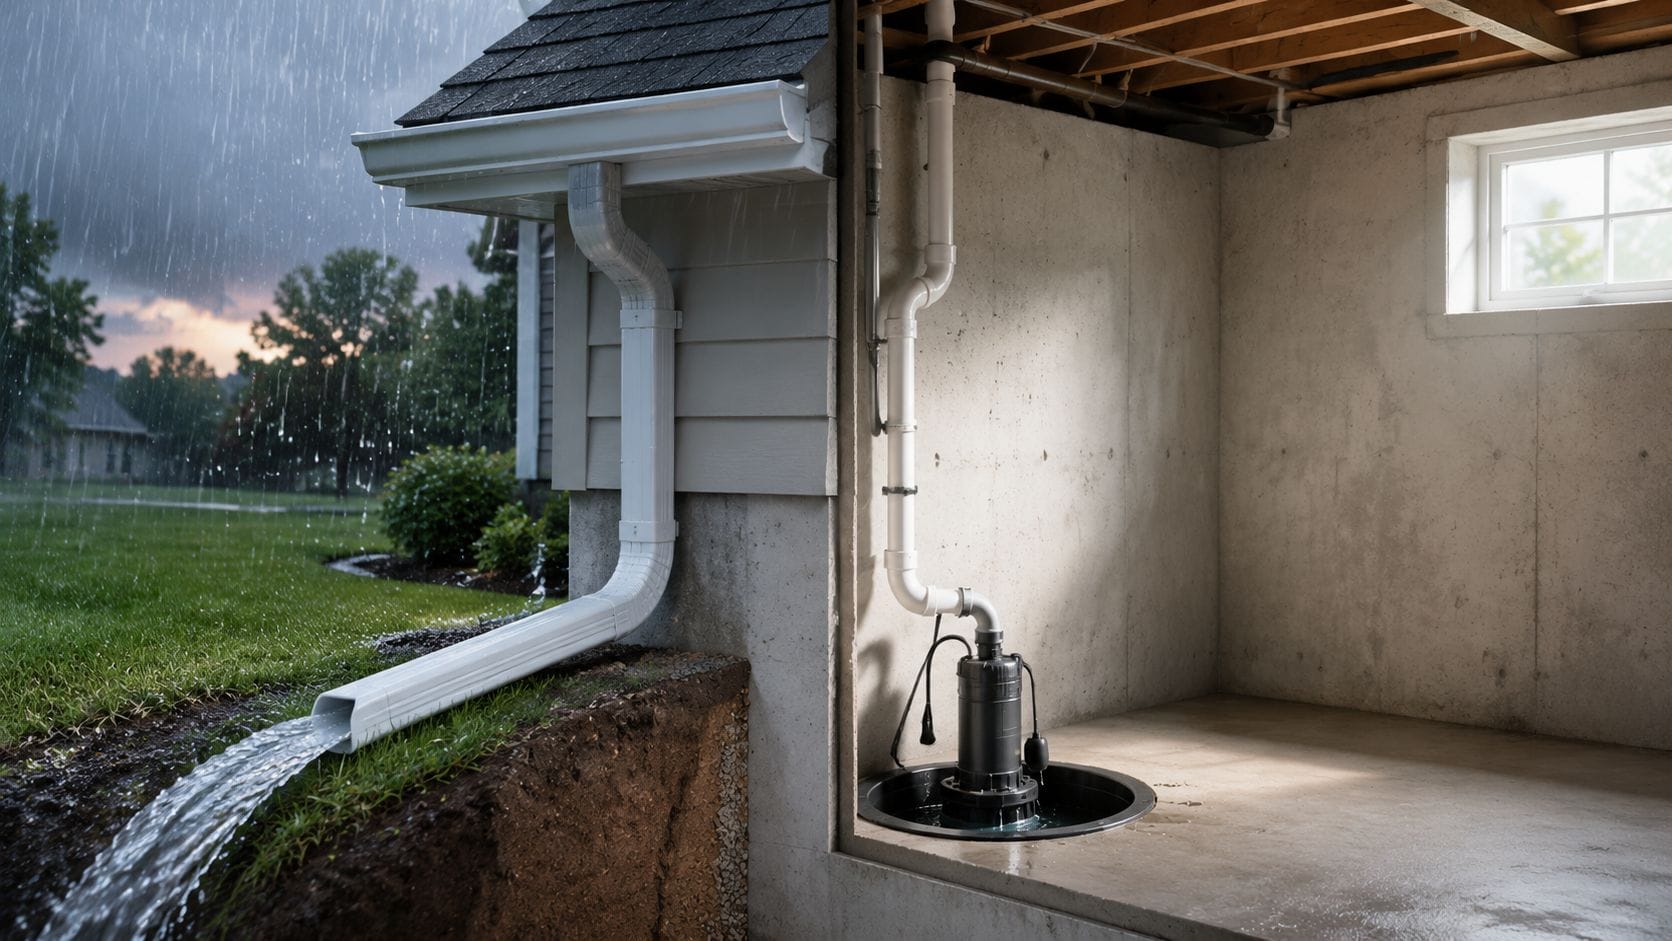
The storm is still working its way across the neighborhood when you hear the sump pump start cycling faster. Then you notice the dark stain spreading where the basement wall meets the floor. A shop vacuum can't keep up, cardboard smells damp, and the dog refuses to go near the corner. If you're asking how to stop water coming into your basement after heavy rain, the first answer is rarely “buy a bigger sump pump.”
A wet basement is usually a drainage-chain problem. Roof runoff, downspouts, soil grading, window wells, foundation pathways, sewer conditions, groundwater pressure, and sump capacity all have to handle the same storm. One weak link can send water indoors. That pattern matters in Southeast Missouri and Mid-Missouri, where clay-rich soils, low-lying areas near the Mississippi, and strong thunderstorm cells can turn an outdoor drainage issue into an indoor cleanup problem.
The immediate question is practical: what can you safely do tonight, and what needs to be corrected before the next major storm?
Table of Contents
- A Rainy Night in a Wet Basement
- Stay Safe and Control the Water Right Now
- Why the Water Gets In and What That Tells You
- Exterior Fixes That Move Water Away From the House
- Interior Systems for Persistent Seepage
- Cost, Effort, and What Each Fix Actually Buys You
- When to Bring in a Professional
A Rainy Night in a Wet Basement
Start with the water that's arriving now, not the repair you wish you'd already made. If the basement is safe to enter, watch where the first water appears. A sheen spreading from the wall-floor joint points you toward a different investigation than water running beneath a basement window or bubbling from a floor drain.
During intense storms, heavy rainfall can contribute to basement sewer backups. In the St. Louis region, MSD Project Clear notes that building backups are most likely to occur during heavy rainfall and recommends inspecting and maintaining the private lateral line that connects a home to the public sewer system in its backup prevention guidance. That means a basement can take on water even when the foundation has no obvious dramatic crack. Missouri's State Emergency Management Agency also advises moving to higher ground when flash flooding is imminent.
Practical rule: Treat rapidly rising basement water as a safety event first and a repair problem second.
The regional setting changes the clues, but not the basic logic. Clay-rich soil can hold water against foundation walls, while intense thunderstorm bursts can overwhelm gutters, surface drainage, sump discharge routes, and municipal systems at the same time. A home in Cape Girardeau, Jackson, Sikeston, Poplar Bluff, Farmington, or Perryville may have different site conditions from one in Columbia, Jefferson City, Fulton, Boonville, or Sedalia, but the inspection question remains the same: where did the water travel before it entered?
Tonight, focus on people, pets, electricity, and damage control. Next month, trace the full chain from roofline to discharge point, then determine whether the basement needs a managed interior drainage system for water that exterior work can't keep out.
Stay Safe and Control the Water Right Now
Turn off power to the affected area before touching water, cords, appliances, or outlets, but only if you can reach the electrical panel without stepping into water. If water is near the panel, gas appliances, or electrical equipment, leave the basement and call a qualified utility, electrician, or water-mitigation professional.
Once the area is safe, work in this order:
- Stop the exposure. Keep children and pets out. Do not enter water that may contain sewage, has a foul odor, or is rising quickly.
- Document before cleanup. Photograph the water line, staining, damaged materials, and every visible entry point. Add times to the photo log so the event is easier to explain to an insurer.
- Move porous belongings. Take cardboard, paper, fabrics, and stored clothing to a dry area. Lift furniture if possible, and remove area rugs to prevent dye transfer onto clean carpet.
- Remove small amounts of clean water. A wet/dry vacuum can handle shallow puddles. Discharge it into a floor drain that is accepting water or to a safe exterior location. Never pump water back into the basement.
- Exchange humid air. Open windows when outdoor conditions allow. Run fans or a dehumidifier to move moisture out of the space.
Fast-rising water, sewage backup, or structural cracking calls for evacuation and professional help, not DIY cleanup. Call a remediation crew or utility professional. If water came through a drain, stop using fixtures until a plumber or drain specialist determines whether the blockage is inside the home or related to a public sewer surcharge.
For a practical drying sequence and equipment considerations, the Restore Heroes flood drying guide provides useful reference material. During the next 48 hours, track visible moisture, drywall and insulation condition, and indoor humidity. Dry materials promptly and keep relative humidity below 50 percent, a target also used when managing persistent basement seepage. In Southeast Missouri, humid storm conditions can slow drying, so continue checking concealed areas rather than relying only on a dry surface.
Why the Water Gets In and What That Tells You
The most useful diagnosis separates two problems that often occur together: surface-water overload and groundwater pressure. Each leaves different clues, and each calls for a different correction within the drainage chain.
Start with the storm's timing. Roof runoff can spill from an overflowing gutter, short downspout, driveway, patio, or reverse-pitched soil and reach a window well, foundation crack, cove joint, mortar joint, or utility penetration. Water from this pathway often appears during the heaviest part of the downpour and runs down the wall before collecting at the floor.
Groundwater pressure follows the condition of the soil around the footing. Once that soil becomes saturated, water can push inward or upward through the cove joint, slab edge, floor cracks, porous concrete, or another low point. Clay-rich soil can keep pressure high after rainfall ends, a pattern worth watching in Southeast Missouri, where humid storm conditions and dense soil can slow drainage and drying.
Clear seepage that continues after gutters and surface runoff have been corrected needs a different investigation than muddy water crossing the floor from a wall. The repair may involve several linked steps, from roof discharge and grading to foundation drainage, rather than one coating or patch.
Read the timing and location
Keep a simple storm log. Record when rain intensifies, when water first appears, what it looks like, and how quickly entry stops.
- Wall or window first: Suspect roof or yard runoff reaching a foundation pathway.
- Cove joint or slab edge first: Consider groundwater pressure or a need for interior drainage.
- Silt or debris in the water: Surface runoff or soil movement may be involved.
- Continued seepage after rainfall: Saturated soil and hydrostatic pressure become more likely.
- Water at a floor drain or from several fixtures: Consider sewer or mainline surcharge instead of foundation seepage.
A basement that leaks only after intense rainfall may be facing a short-duration overload that exceeds the site's or drainage system's capacity. Missouri's State Emergency Management Agency warns that flash flooding can develop quickly around low-lying areas, streams, drainage channels, and other places where water can rise suddenly. When flooding is imminent, SEMA advises moving immediately to higher ground, as outlined in its Missouri flooding guidance. For basement diagnosis, the practical takeaway is to distinguish ordinary seepage from rapidly rising water that may be part of a broader flood event.
For an explanation of how grading, foundation drainage, and water pathways should be evaluated together, review these foundation drainage and grading tips. Match the symptom to the pathway before choosing a repair.
Exterior Fixes That Move Water Away From the House
After a storm, trace the water from the roof to its final discharge point. Exterior drainage works as a chain. A failure at the gutter, downspout, grade, window well, or discharge area can send water back toward the foundation. In Southeast Missouri, intense storms and soils that hold water can overload that chain quickly, so the first repair should address the path that is carrying the most water.
Start with the roof runoff
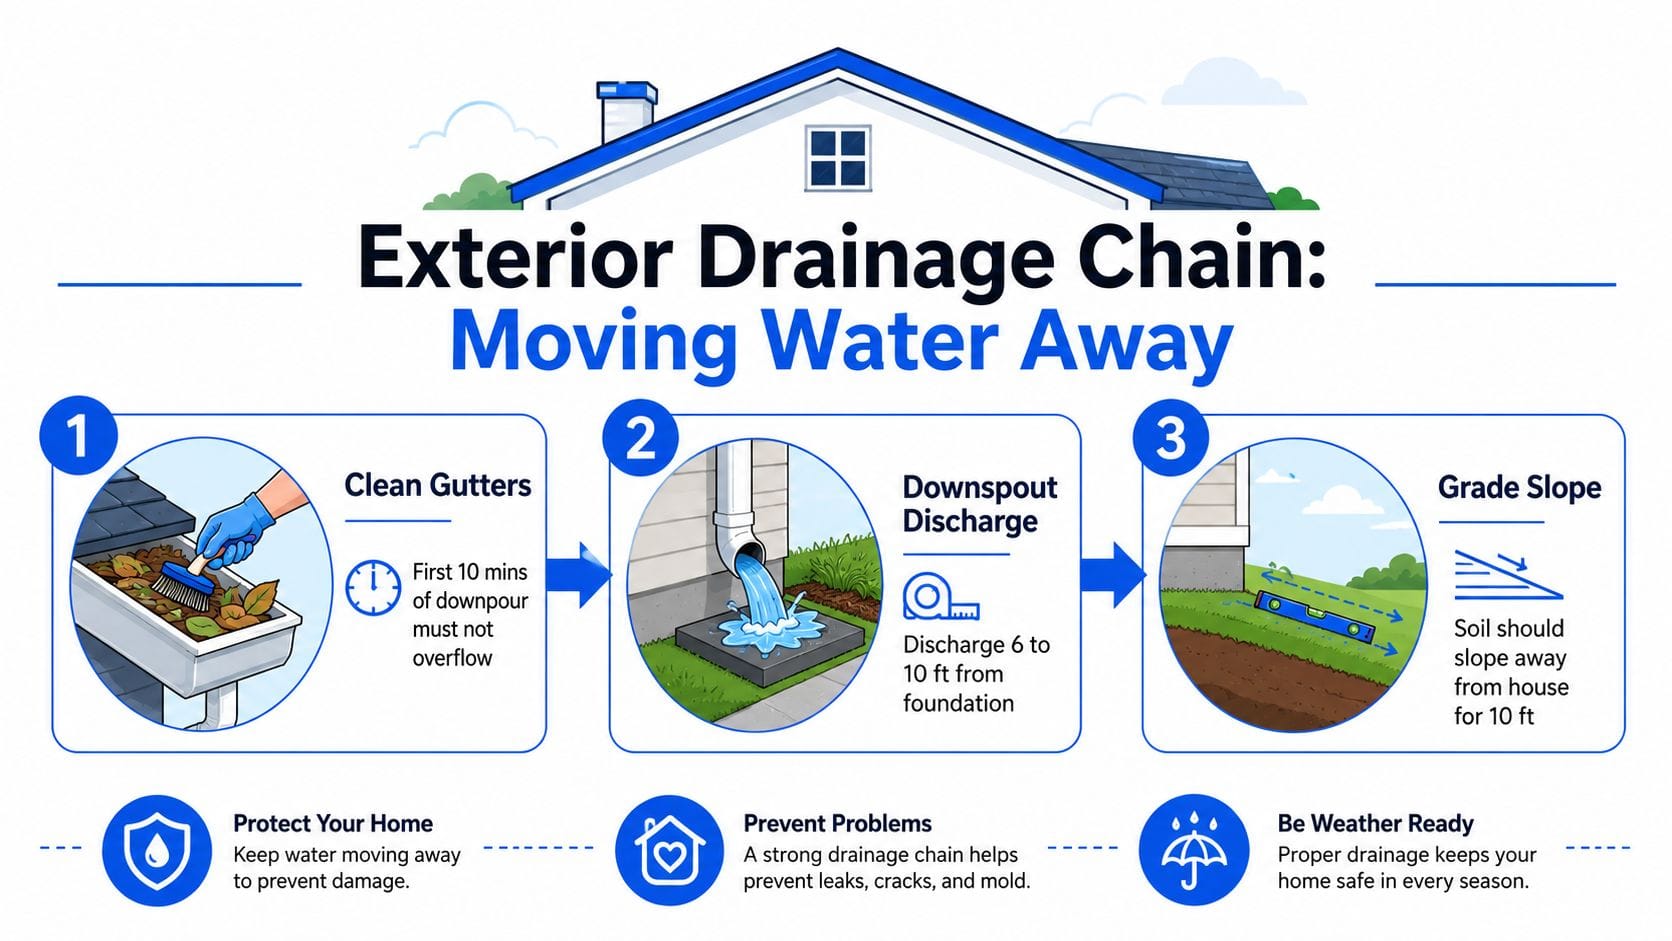
Clear gutters at least twice a year, then inspect them after nearby tree work or severe weather. Confirm that every downspout is connected and that its outlet carries water at least 6 feet from the foundation, with 10 feet preferred when possible. Use an extension or buried solid pipe if a short splash block leaves water beside the wall. The importance of working gutters becomes clear when a blocked section turns roof runoff into a concentrated stream beside the basement. A gutter that looks acceptable on a dry afternoon may still overflow during the first hard burst of rain if leaves or roof grit have reduced its capacity.
Check the ground next. Municipal and building-reference guidance commonly uses a fall of about 6 inches over the first 10 feet, roughly a 5 percent grade, away from the foundation, as described by proper grading guidance. For impervious surfaces, the International Residential Code uses a 2 percent slope away from the building within 10 feet. ENERGY STAR guidance calls for permeable surfaces to slope at least 0.5 inch per foot over that distance, according to foundation grade slope guidance.
Correct weak points around the lot
Use compacted fill near the foundation. Loose topsoil settles and can recreate a reverse pitch. Basement window wells need the same attention. A well should shed water, so repair or add a cover where appropriate, refresh it with 8 to 12 inches of clean gravel, and check that the drain tile is not crushed, blocked, or capped.
Where runoff crosses the lot, a shallow swale can route it around the house. A berm can assist with that diversion, provided it slopes about 1 inch per foot and extends at least 10 feet, as described in FEMA's basement flood mitigation guidance.
The discharge point must accept the flow. A longer extension still fails if it empties into a low spot, and a swale can worsen seepage if it directs water toward the foundation or an already overloaded drain. Review gutter and downspout extensions for routing options, then call a drainage specialist if water remains after the surface path has been corrected.
Interior Systems for Persistent Seepage
Exterior corrections are the first step for runoff-driven leaks, but saturated soil can still push water inward. This is common when seepage begins at the cove joint or slab edge after the yard, roofline, and window wells are being managed properly. In Southeast Missouri, intense storms and moisture-holding soils can keep that pressure active after surface water has drained away.
Match the repair to the entry point
A clean, dry, stable hairline foundation crack may accept epoxy injection. Active leaks, cold joints, and damp cracks generally call for flexible polyurethane instead. The material must suit the wall's movement and moisture conditions, and the concrete needs enough preparation for the repair to bond.
Hydraulic cement can create a cove-edge bead where the floor meets the wall. It limits water at that location, but pressure may remain behind the patch. Continued pressure can redirect water through the slab or a nearby joint, so monitor the area after the next heavy storm.
Collect water below the floor
For recurring seepage, an interior perimeter drain, often called interior drain tile, collects water before it spreads across the basement. Perforated pipe sits in washed gravel near the footing or along the slab perimeter and leads to a sump basin. A submersible pump then sends the water to a discharge point that will not return it to the foundation.
FEMA's basement mitigation reference reports that properly designed interior drainage systems solve about 85 to 95 percent of non-structural basement water problems, while DIY-only fixes for persistent intrusion are often reported at about 40 to 50 percent success. These figures apply to recurring, non-structural water problems and do not describe every foundation condition.
A sump installation should have a check valve, high-water alarm, and backup capacity. Depending on the property and available utilities, that may be a battery backup or water-powered backup. Test the float, inspect the discharge line, and confirm that the pump can run during a power interruption.
For maintenance guidance, see the JMJ Plumbing basement flooding prevention resource. Seal wall penetrations, run a dehumidifier, and keep relative humidity below 50 percent. Delay basement finishing until the drainage system has performed through a full dry season and the water source is reasonably established.
Crawlspaces need the same moisture diagnosis. The resource on crawlspace encapsulation explains related moisture-control principles, but an inspection should determine whether the property needs drainage work, vapor control, structural repair, or a combination.
Cost, Effort, and What Each Fix Actually Buys You
The right repair is the one that addresses the entry pathway. Cleaning a gutter can stop roof runoff, but it won't relieve pressure beneath a slab. An interior drain system can collect seepage, but it won't correct a downspout that discharges beside the foundation.
| Fix | Typical Cost | Effort / Time | What It Actually Buys You |
|---|---|---|---|
| Gutter cleaning and downspout extensions | Under $50 to a few hundred dollars | DIY weekend work | Reduces concentrated roof runoff beside the foundation |
| Regrading and window-well gravel refresh | Under $50 to a few hundred dollars | DIY weekend work | Improves surface drainage and reduces pooling |
| Window-well replacement or buried downspout runs | $500 to $2,500 | Contractor work, one to three days | Routes water away when surface fixes need permanent installation |
| Exterior hydraulic-cement patching or partial crack injection | $500 to $2,500 | Contractor work, one to three days | Addresses selected cracks or joints, not system-wide pressure |
| Exterior excavation and waterproofing membrane | $3,000 to $15,000 | Several days of major work | Treats the exterior wall directly, with substantial access and site disruption |
| Interior drain tile, sump pump, backup, or French drain | $3,000 to $15,000 | Several days of major work | Collects and removes water that exterior work can't fully exclude |
The cost ranges above are planning categories, not quotes. Soil access, foundation construction, interior finishes, discharge routing, and the extent of damage can change the scope substantially.
Interior wall coatings deserve particular skepticism. Paint applied to the inside doesn't stop hydrostatic pressure, and it can fail when moisture continues moving through the wall. In many recurring cases, several modest exterior corrections paired with one properly designed interior drainage system are more useful than one expensive product chosen without diagnosis.
When to Bring in a Professional
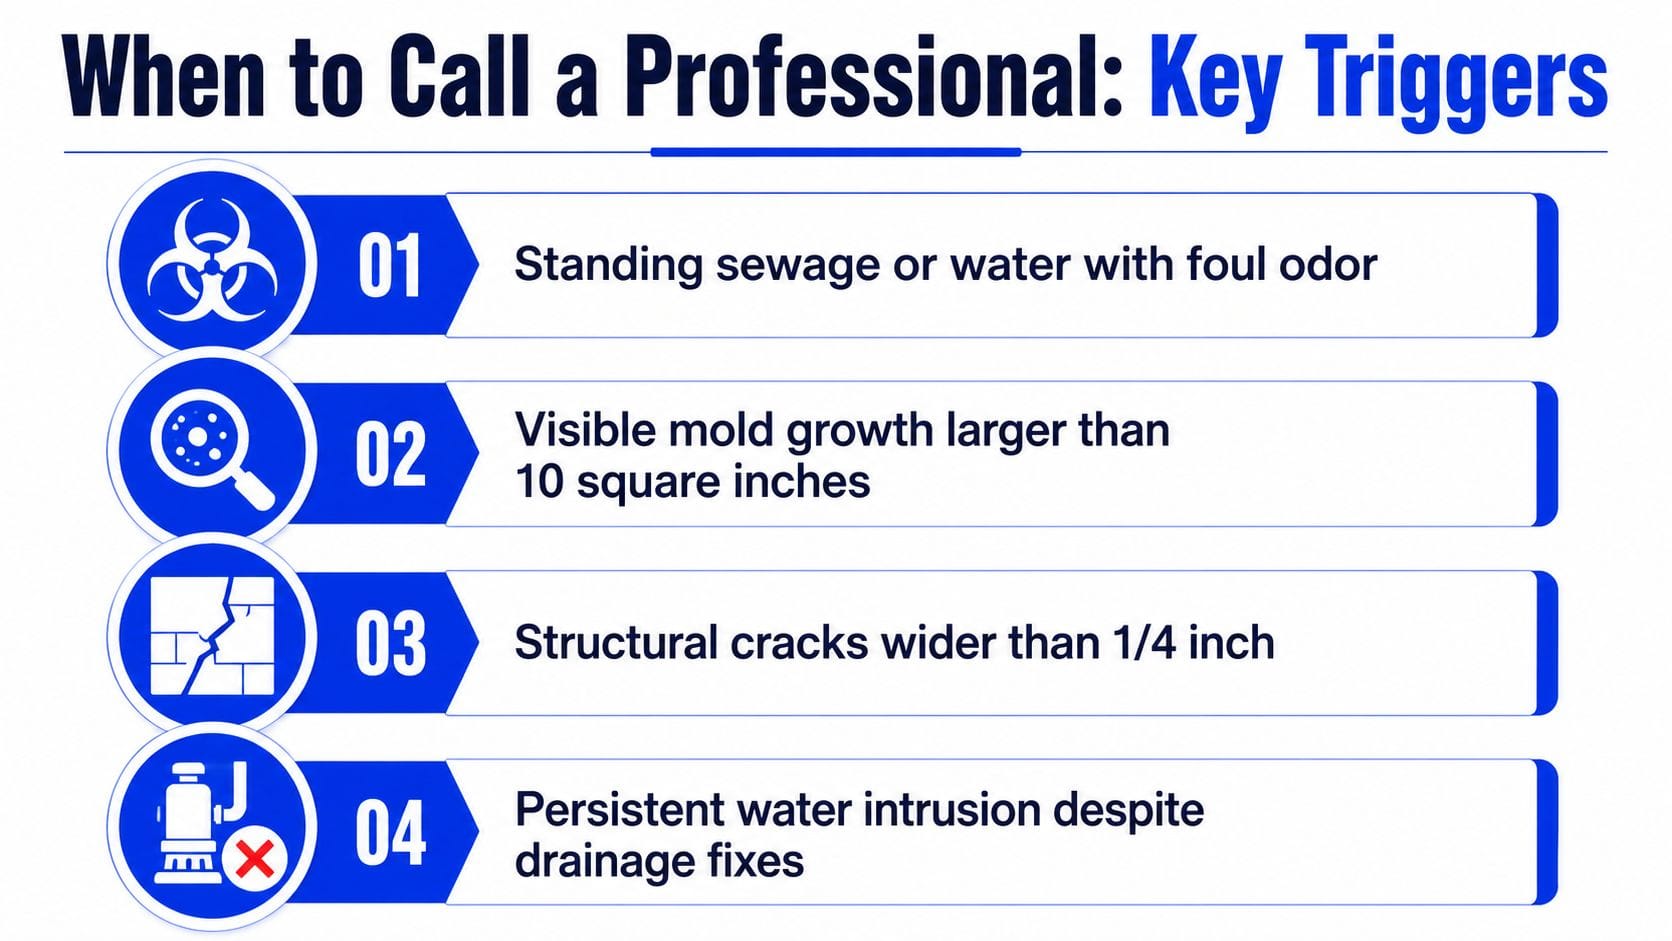
Call for help when the water creates a health, electrical, structural, or documentation problem. Standing sewage, visible mold growth larger than a square foot, a musty odor that remains after drying, and water near electrical panels or gas appliances all move the situation beyond routine maintenance.
A licensed water-mitigation or structural-drying company should become involved within 24 to 48 hours when porous materials, finished walls, insulation, or significant standing water have been affected. Ask for moisture-meter readings, photographs, a written drying plan, and an estimate that clearly separates extraction, demolition, drying, cleaning, and reconstruction. Those records are more useful than a verbal promise that the basement “feels dry.”
Match the specialist to the clue
- Structural engineer: Call for horizontal foundation cracks, bowing walls, or stair-step cracks through masonry. These signs may indicate movement that drainage work alone won't correct.
- Sewer-scope technician or plumber: Arrange a sewer evaluation if floor drains gurgle, several fixtures back up during storms, or water appears to be coming through the drainage system. That pattern can point to a municipal or mainline surcharge rather than groundwater.
- Mold professional: Use a qualified mold assessment or remediation professional when growth is extensive, materials stayed wet, or the odor persists after drying. Don't disturb suspect materials unnecessarily.
- Radon professional: Consider radon testing if the basement has flooded through a sump pit. Water can disrupt a sump lid seal and create another pathway into the living space.
- Electrician or utility professional: Bring one in when water reaches electrical equipment, breakers trip, wiring is wet, or gas appliances may have been exposed.
Before hiring a contractor, verify licensing where applicable, proof of insurance, references from projects with similar soil and foundation conditions, and a written warranty. The warranty should state what is covered, what is excluded, and whether it addresses water entry, equipment failure, or only the installed materials.
Use the next storm as a controlled check
The day before heavy weather, clear gutters and downspouts. Walk the yard and look for low spots or hardscape that pitches back toward the foundation within 10 feet of the house. Confirm that the sump pump is plugged in, the float moves freely, the backup system is ready, and a wet/dry vacuum, towels, and tarp are staged near the basement stairs.
During the storm, stay out of standing water if outlets or appliances are within reach. Keep a charged phone nearby and photograph new seepage by location and time. Afterward, run the dehumidifier, inspect window wells and wall-floor joints, and compare any leaking crack with your previous photos.
One storm is diagnostic information, not a final verdict. A change in where water enters, how quickly it rises, or how long seepage continues is the signal to reassess the whole drainage chain rather than replace the same component again.
Upchurch Inspection can evaluate basement and crawlspace moisture intrusion, grading and drainage conditions, foundation cracks, and indications of water penetration during a home or commercial inspection. Visit Upchurch Inspection to schedule an inspection that helps identify the likely pathway and prioritize the next professional step.