TL;DR:
- A property inspection checklist workflow provides a structured, four-stage process to ensure thorough and defensible evaluations. It emphasizes defining scope, capturing findings with photo evidence, and maintaining locked records to protect negotiations and prevent disputes. Proper discipline and digital tools enhance inspection quality, helping buyers, sellers, and investors maximize leverage and safeguard their investments.
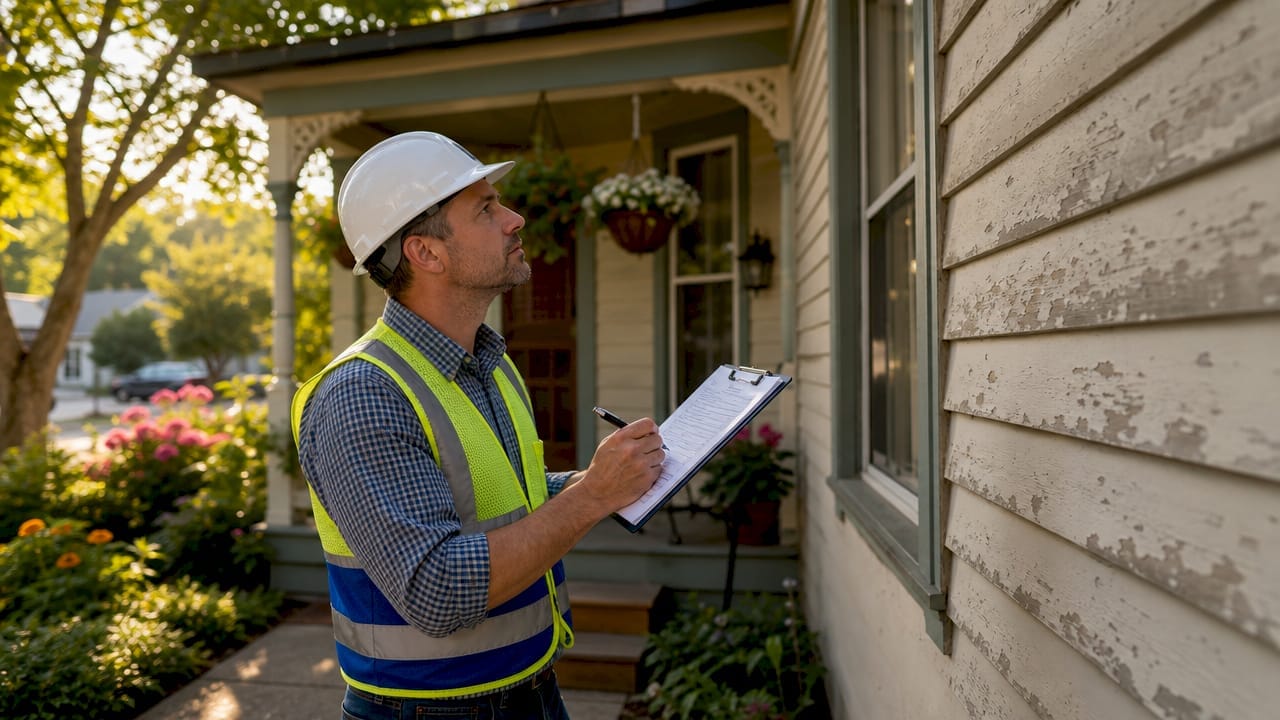
A property inspection checklist workflow is a systematic, stage-by-stage process that guides homebuyers and real estate professionals through every phase of a property evaluation, from defining scope to locking the final report. Without this structure, inspections become reactive and inconsistent, leaving critical defects undocumented and negotiation leverage on the table. The home inspection process is not simply a walkthrough with a flashlight. It is a repeatable, evidence-backed protocol that protects your investment and produces defensible documentation. At Upchurchinspection, we build every evaluation around this workflow because thoroughness is not optional in high-stakes real estate transactions.
What does an effective property inspection checklist workflow require?
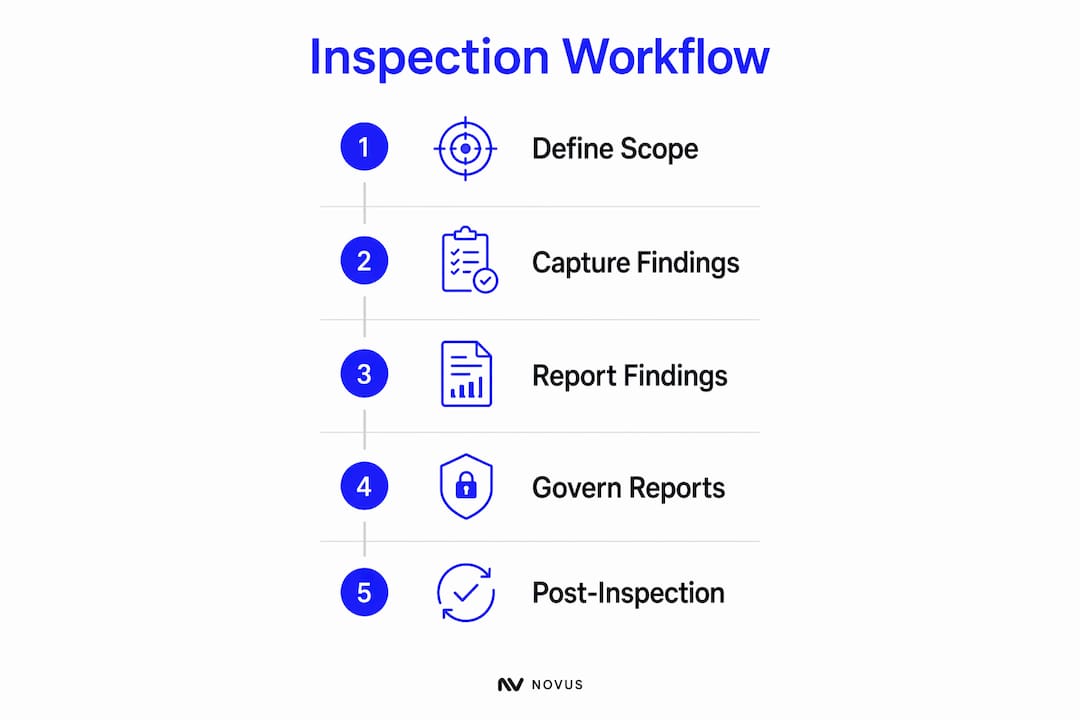
A structured inspection workflow follows four defined stages: define scope, capture findings, report findings, and govern the record. Each stage depends on the one before it, and skipping any stage creates gaps that surface later as disputes or costly surprises. This framework applies whether you are evaluating a single-family home or a multi-unit commercial building.
Before any inspector sets foot on a property, the scope must be defined. Scope means identifying which systems and areas the inspection will cover, what checklist template applies to the property type, and which compliance standards govern the process. A residential checklist for home buyers differs significantly from a commercial property assessment guide. Residential checklists typically cover structure, roofing, electrical, plumbing, HVAC, interior rooms, kitchen, and bathrooms. Commercial checklists add site systems, mechanical rooms, and ADA compliance checks.
The tools you use directly affect the quality of your workflow. Inspection software platforms allow inspectors to build digital checklists, attach photos to specific findings, and generate structured reports on-site. Mobile apps with offline capability matter in properties with poor connectivity. Home inspection costs for buyers typically range from $300 to $500 for a standard single-family home, with specialized tests such as radon or sewer scopes adding to that total. Budgeting for add-ons is part of scope definition, not an afterthought.
Key elements to prepare before the inspection begins:
- A checklist template matched to the property type (residential, multi-family, or commercial)
- Digital inspection software or a structured paper form with photo fields
- A defined list of systems to evaluate, ordered by inspection path
- Compliance standards relevant to the transaction (lender requirements, local codes)
- Inspector credentials verified before scheduling
Pro Tip: Hire inspectors who hold ASHI (American Society of Home Inspectors) or InterNACHI (International Association of Certified Home Inspectors) credentials. Inspector licensing is not federally regulated and varies by state, so credential verification is the buyer’s responsibility.
How to conduct a property inspection systematically
A systematic inspection follows a repeatable path through the property, covering every system in a defined sequence. Most standard inspections take two to four hours on-site and are non-invasive and visual. Larger or more complex properties take longer, and that time investment is justified by the documentation it produces.
The room-by-room, system-by-system sequence prevents the inspector from doubling back or missing areas under time pressure. Here is the path we recommend at Upchurchinspection:
- Exterior and site. Evaluate grading, drainage, driveways, walkways, fencing, and vegetation proximity to the structure. Document any visible foundation cracks, efflorescence, or settlement.
- Roof and attic. Inspect roofing materials, flashing, gutters, downspouts, and attic ventilation. Roofing material ratings affect expected service life and replacement cost estimates.
- Structural components. Check foundation walls, floor framing, beams, and columns for signs of movement, moisture intrusion, or deferred maintenance.
- Electrical system. Inspect the main panel, subpanels, wiring type, grounding, GFCI protection, and visible outlets and fixtures.
- Plumbing system. Evaluate supply lines, drain lines, water heater age and condition, fixtures, and visible signs of leaks or corrosion.
- HVAC systems. Test heating and cooling equipment; inspect ductwork, filters, and flue connections. Note equipment age relative to expected service life.
- Interior rooms. Move through each room checking walls, ceilings, floors, windows, and doors for defects, moisture staining, or functional failures.
- Kitchen and bathrooms. Test all fixtures, appliances included in the sale, ventilation fans, and under-sink plumbing.
- Garage and outbuildings. Inspect fire separation walls, garage door operation, and any detached structures included in the sale.
Systematic photo capture improves both the speed and quality of inspection reporting. Every finding needs at least one photo, and high-risk areas warrant multiple angles.
Pro Tip: Photograph every room from the entry point before moving to defects. This establishes spatial context for each finding and makes the final report far easier to read and use in negotiations.

What is the process for reporting and governing inspection findings?
Capturing findings on-site is only half the work. The reporting stage transforms raw notes and photos into a structured document that buyers, sellers, and agents can act on. Photo evidence must be attached to specific findings with defined location, category, and severity. A disorganized folder of photos with no connection to checklist items is not a report. It is a liability.
Structured reports include an executive summary, a system-by-system breakdown, and a findings table that categorizes each defect by severity. Clear pass/fail or satisfactory/deficient designations remove ambiguity. When a buyer’s agent reads “electrical panel requires immediate evaluation by a licensed electrician,” that is a point of negotiation. When they read “some electrical issues noted,” it is noise.
| Report element | Purpose |
|---|---|
| Executive summary | Gives buyers and agents a fast overview of major findings |
| System-by-system breakdown | Provides detailed findings organized by inspection area |
| Photo-linked findings | Connects each defect to visual evidence with location and severity metadata |
| Pass/fail designations | Removes ambiguity and supports clear repair request language |
| Signed and locked record | Prevents unauthorized edits and creates a defensible audit trail |
Governance of inspection records involves signing off and locking report versions to prevent silent edits after delivery. This matters in transactions where disputes arise weeks after the inspection. A locked, timestamped report with a clear audit trail is defensible in mediation or litigation. An unlocked document with no version history is not.
How to manage post-inspection workflow for negotiation leverage
The inspection report is delivered. What you do in the next 48 hours determines how much negotiation leverage you retain. The post-inspection workflow advises reading the report immediately, sorting issues by category, scheduling specialists early, and submitting repair requests within 5 to 10 days. Speed preserves your options within the contingency window.
Triage the findings into three categories as soon as you receive the report:
- Safety issues. Items that pose immediate risk to occupants, such as exposed wiring, gas leaks, or structural instability. These are non-negotiable repair requests in most transactions.
- Structural and major system defects. Foundation movement, roof failure, HVAC systems past service life, or plumbing that requires full replacement. These often warrant specialist inspections before finalizing repair requests.
- Maintenance items. Deferred maintenance that is real but not urgent, such as caulking failures, minor grading issues, or aging water heaters still within service life. These may be addressed as credits rather than repairs.
Inspections are typically scheduled within 7 to 10 days after offer acceptance to meet contingency timelines. Delays in scheduling reduce the time available for specialist follow-up inspections. If the general inspection reveals potential foundation movement or active roof leaks, a structural engineer or roofing contractor needs to be on-site before the contingency deadline. Booking those specialists the day the report arrives is not overcautious. It is standard practice for experienced buyers and agents.
Repair requests should be specific, tied to report findings, and supported by photo evidence. “Repair or replace the 2003 HVAC unit in the primary residence per inspector recommendation” is a defensible request. “Fix the AC” is not. Your inspection tips for buyers should include a template for structuring repair requests directly from report language.
How does a property condition assessment differ from a standard home inspection?
A Property Condition Assessment (PCA) is a formal evaluation methodology used primarily for commercial real estate, lending, and investment transactions. It is not a substitute for a residential home inspection, and the two serve fundamentally different purposes.
| Factor | Standard home inspection | Property condition assessment |
|---|---|---|
| Primary user | Residential homebuyer | Commercial lender or investor |
| Governing standard | State licensing requirements | ASTM E2018 |
| Scope | Visual, non-invasive, residential systems | Document review, walkthrough, cost opinions |
| Deliverable | Inspection report with findings | Property condition report with cost projections |
| Specialist involvement | Recommended for flagged items | Built into the process |
PCAs under ASTM E2018 include four components: document review, a walk-through survey to identify visible deficiencies, cost opinions for repair and replacement, and a formal property condition report. This structure is designed for lenders and investors who need to quantify deferred maintenance and project capital expenditure over a defined hold period. A residential buyer does not need a PCA for a single-family home purchase. An investor acquiring a 40-unit apartment building or a commercial retail center does.
The cost opinion component is the clearest distinction. A standard home inspection identifies that the HVAC system is aging and recommends evaluation. A PCA states that the HVAC system has an estimated remaining service life of three years and replacement will cost approximately $18,000 per unit, creating a capital reserve requirement. That level of specificity is what lenders require before approving commercial acquisition financing. Upchurchinspection provides commercial property assessments that meet these standards for Mid-South investors and lenders.
Key takeaways
A disciplined property inspection checklist workflow, built on four defined stages and supported by photo evidence and locked reporting, is the most reliable method for protecting a real estate investment and maximizing negotiation leverage.
| Point | Details |
|---|---|
| Four-stage workflow | Define scope, capture findings, report findings, and govern the record to produce defensible evaluations. |
| Credential verification | Hire ASHI or InterNACHI-certified inspectors; state licensing alone does not guarantee qualification. |
| Photo-linked evidence | Attach photos to specific findings, including location and severity metadata, to support negotiations and audits. |
| Post-inspection speed | Read the report immediately and submit repair requests within five to ten days to preserve contingency leverage. |
| PCA vs. home inspection | Use ASTM E2018 property condition assessments for commercial and investment transactions, not residential purchases. |
Why workflow discipline separates good inspections from great ones
I have reviewed hundreds of inspection reports over the years, and the pattern is consistent. The reports that fail buyers are not the ones written by careless inspectors. They are the ones produced without a defined workflow. An inspector who walks a property without a structured checklist path will miss the crawlspace moisture because they checked the attic first and ran out of time. They will note “some electrical concerns” instead of flagging the double-tapped breakers by location and panel position.
The photo evidence issue is where I see the most value lost in negotiation. Buyers receive a report with 200 photos in a folder with no connection to the findings. Their agent cannot use that in a repair request. The seller’s agent dismisses it. When photos are linked directly to findings with severity labels, the conversation changes immediately. The seller cannot claim the inspector was exaggerating when the photo shows active water intrusion at the base of the foundation wall, timestamped and geotagged.
Digital tools make this discipline scalable. Platforms that build the checklist, photo attachment, and report generation into a single workflow eliminate the manual assembly step that creates errors. If you are a real estate professional managing multiple transactions, integrating digital inspection workflow tools early is not a luxury. It is the difference between reports that close deals and reports that create disputes. The examples of inspection reports we publish show exactly what photo-linked, structured documentation looks like in practice.
— Holly
See how Upchurch Inspection supports your real estate decisions
Upchurch Inspection serves homebuyers, sellers, and real estate professionals across the Mid-South with residential and commercial inspections that go well beyond a basic checklist. Our inspectors hold credentials that exceed state standards, and every report we deliver is structured, photo-linked, and audit-ready. Whether you are a first-time buyer preparing for your first walkthrough or an investor evaluating a multi-unit property, the benefits of regular inspections extend far beyond the transaction itself. We also provide resources for agents managing commercial inspection workflows and investors protecting larger assets. Contact Upchurchinspection to schedule an evaluation or explore our full library of inspection guides.
FAQ
What is a property inspection checklist workflow?
A property inspection checklist workflow is a structured, repeatable process covering four stages: defining scope, capturing findings, reporting findings, and governing the record. It produces consistent, defensible evaluations for real estate transactions.
How long does a standard home inspection take?
Most standard home inspections take two to four hours on-site for a typical single-family home. Larger or more complex properties require additional time, and detailed reports follow the on-site visit.
When should I schedule a home inspection after making an offer?
Schedule the inspection within seven to ten days of offer acceptance to preserve your contingency options. Delays reduce the time available for specialist follow-up and for submitting repair requests.
What is the difference between a home inspection and a property condition assessment?
A home inspection is a visual, non-invasive evaluation for residential buyers. A property condition assessment follows ASTM E2018 and includes document review, cost opinions, and a formal report designed for commercial lenders and investors.
How do I use an inspection report in negotiations?
Read the report immediately upon delivery, sort findings into safety, structural, and maintenance categories, and submit specific repair requests tied to report language and photo evidence within your contingency window.