
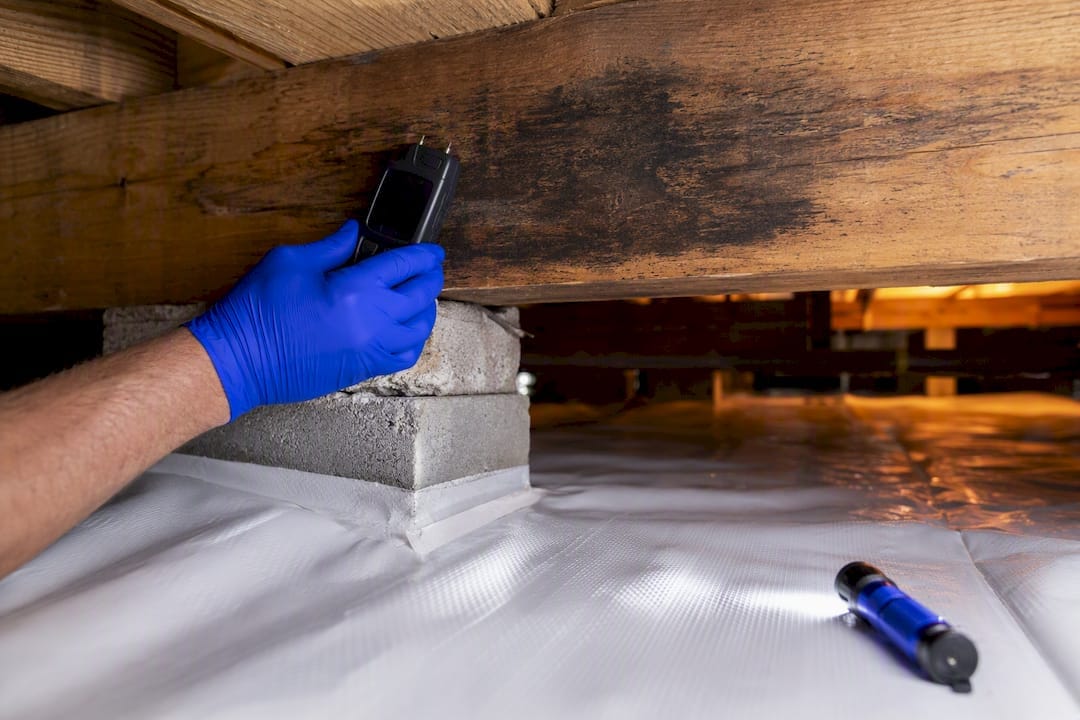
Ongoing active mold in a crawl space is not acceptable, and it needs a plan, not a shrug. Small patches of old, dry staining on a joist are a different animal than active colonization spreading across your subfloor. If you’re buying a property or managing one, the first move is simple: stop the moisture source and, if you’re mid-transaction, add a focused crawl-space mold inspection to your due diligence before you close.
TL;DR:
- Active mold growth in crawl spaces presents a greater risk when it spreads across multiple areas or causes structural damage, requiring a comprehensive repair plan.
- Moisture sources like ground evaporation, poor grading, plumbing leaks, or high indoor humidity must be addressed to prevent ongoing mold colonization.
- Visual signs, moisture meter readings above 16%, and temperature discrepancies on thermal imaging indicate active mold, while dry, dark stains suggest historical issues.
- A detailed inspection including moisture mapping, quadrant photos, and vapor barrier checks costs between $200 and $600 and provides actionable data for negotiations.
- Proper containment during remediation and fixing exterior grading or vapor barrier gaps are crucial to preventing mold from reemerging.
Table of Contents
- What Does Mold in a Crawl Space Look Like?
- Why Do Crawl Spaces Get Mold in the First Place?
- How Do You Tell Active Mold From Old Staining?
- What Does Mold Remediation Actually Cost and Take?
- How Do You Keep Mold From Coming Back?
- When Should You Call a Licensed Mold Inspector?
- How Do You Safely Access a Crawl Space Before Inspecting It?
- How Do You Contain Mold Spread During Remediation?
- Field-Informed Takeaway From Holly at Upchurch Inspection
- Get a Crawl-Space Mold Inspection Before You Close
- Primary Sources and Further Reading
- Sources
- FAQ
What Does Mold in a Crawl Space Look Like?
Active mold usually shows up as fuzzy, raised growth in black, green, white, or orange patches, often clustered where wood meets damp soil or near plumbing penetrations. Historical staining, by contrast, tends to be flat, dark, and dry to the touch, sometimes left over from a leak fixed years ago. Smell is often the earliest clue. A musty, earthy odor coming up through floor vents or around baseboards frequently means there’s active growth somewhere you can’t see yet, even before anyone spots a visible patch.
Structural clues matter just as much as color and smell. Sagging floors, spongy spots underfoot, or joists that look chalky and soft under a flashlight often point to sustained moisture exposure that predates the mold itself.
- Isolated spots on one or two joists near a known past leak usually mean a smaller, contained cleanup.
- Growth spread across multiple quadrants, especially on subfloor sheathing, usually signals an ongoing moisture problem that needs a bigger fix.
- Any growth paired with soft or delaminating wood should be treated as a structural flag, not just a mold flag.
The CDC’s guidance on mold and health is blunt about this: if you see or smell mold, the priority is removing it and fixing the moisture problem, not spending time identifying the exact species first.
Why Do Crawl Spaces Get Mold in the First Place?
Moisture is the whole story. Mold spores exist almost everywhere, but they only become a growth problem when they land on a damp surface and stay damp long enough to colonize, according to the EPA’s guide to mold and moisture. In a crawl space, that moisture usually comes from a short list of repeat offenders.
- Bare or poorly covered earth floors releasing ground moisture through evaporation.
- Poor site grading or clogged gutters directing rainwater toward the foundation instead of away from it.
- Plumbing leaks, condensation on ductwork, or a water heater tucked into the crawl space itself.
- High indoor humidity pulled into the crawl space through vents or gaps.
Relative humidity persisting above roughly 60% is generally enough to support colonization on wood and insulation over time, which is why seasonal humidity swings matter as much as a single flood event. Across the Mid-South, from West Tennessee’s clay-heavy soil to the Arkansas Delta, we see a consistent pattern of high groundwater tables and heavy spring runoff pushing moisture against foundations that were graded correctly decades ago but no longer are. A vapor barrier that’s torn, gapped, or missing altogether lets soil moisture migrate upward by capillary action even when nothing outside looks obviously wrong.
How Do You Tell Active Mold From Old Staining?
A focused crawl-space inspection is built around one question: is this moisture problem happening now, or did it happen once and get fixed? Answering that correctly changes everything about remediation scope and cost, and it’s why a general home inspection often isn’t enough by itself for this specific issue.
Before anyone crawls in, basic safety matters. Cursory homeowner checks should stick to what’s visible from the access hatch, and anyone going further in should use a respirator rated for mold spores, gloves, and eye protection. If standing water, sewage odor, or visible structural collapse is present, that’s a stop sign for a homeowner and a call for a licensed contractor or engineer, not a DIY crawl.
A proper assessment generally follows this sequence:
- Visual scan by quadrant. The inspector documents each section of the crawl space with timestamped photos, noting growth patterns, insulation condition, and vapor-barrier coverage.
- Moisture meter readings on wood framing. Wood moisture at or below roughly 12% typically points to dry, historical staining. Readings at 16% or higher usually indicate active moisture and ongoing risk. The 12–16% band is genuinely ambiguous and often warrants a second reading after a dry spell.
- Thermal imaging where accessible. Cool, damp patches on joists or subfloor sheathing that don’t match the surrounding temperature can reveal moisture intrusion before it’s visible to the eye.
- Vapor-barrier integrity check. Gaps, tears, or missing seams at wall terminations are photographed and mapped, since vapor-barrier failure is often the single biggest driver of recurring moisture problems in a crawl space.
- Lab sampling, only when warranted. Sampling adds real value when there’s a resale, insurance, or legal need for documentation, or when occupants report symptoms with no visible growth. For most straightforward cases where growth and moisture are both visible, sampling doesn’t change what needs to happen next.
Pro Tip: Ask any inspector to show you the moisture meter’s display in the same photo as the reading location. A number without visual proof of where it came from is much harder to trust or use in a repair negotiation.
What Does Mold Remediation Actually Cost and Take?
Remediation scope should match what the inspection actually found, not a worst-case guess. Treating a small, isolated, historical stain the same way you’d treat active colonization across a whole crawl space wastes money in one direction or leaves risk unaddressed in the other.
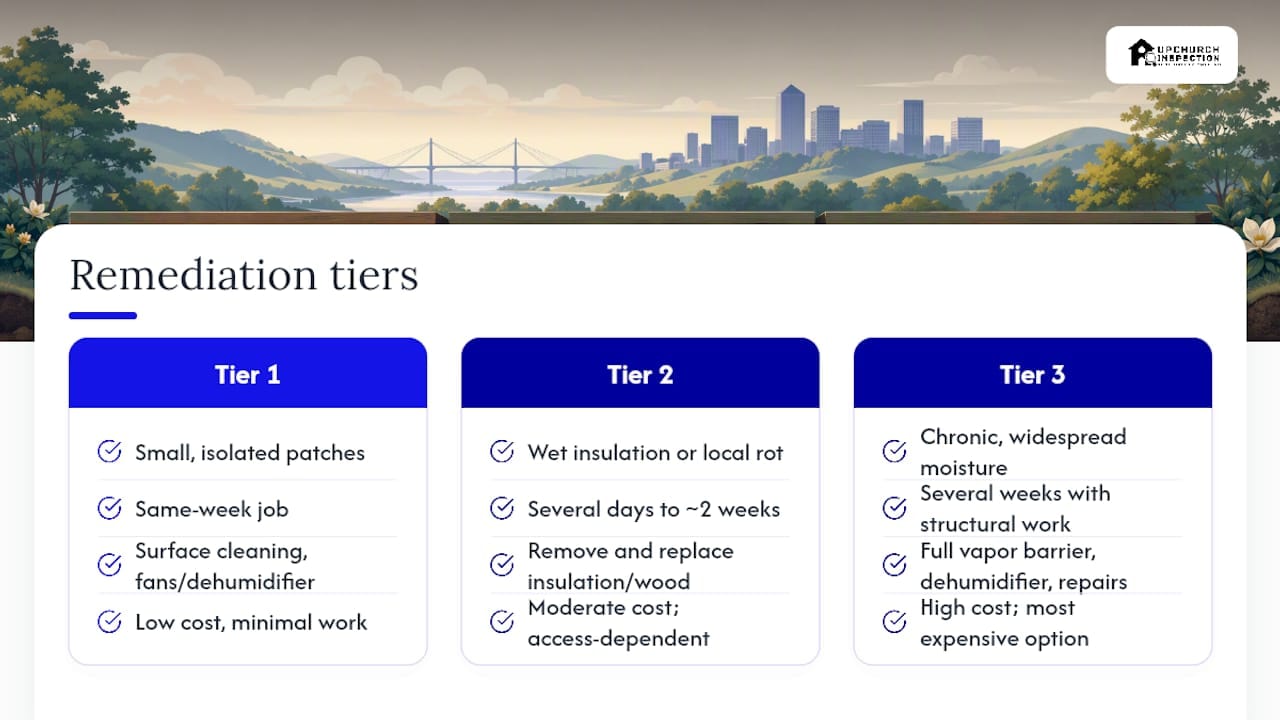
Tier 1: Spot cleaning and drying. For small, isolated patches with dry moisture readings, this typically means surface cleaning, running fans or a dehumidifier for a few days, and confirming the moisture source is gone. This tier is usually a same-week job.
Tier 2: Removing and replacing damaged materials. Wet fiberglass insulation and any wood showing rot or persistent high moisture usually needs to come out and get replaced. Cost here swings on access difficulty and how much material has to move, with tighter crawl spaces and more extensive damage both pushing the number up. Timelines typically run several days to about two weeks depending on drying time between steps.
Tier 3: Full encapsulation with structural repair. When moisture is chronic and widespread, the fix usually involves a heavy-duty vapor barrier across the entire floor and up the walls, a dedicated dehumidifier, sealed vents, and repair of any compromised framing. This is the longest and most expensive tier, often stretching several weeks when structural work is involved, but it’s also the tier most likely to actually solve the problem for good.
The EPA recommends drying wet areas within 24 to 48 hours to prevent growth from taking hold, and that window applies just as much to a crawl space as to a flooded basement. No tier of remediation holds up long term if the underlying moisture source, whether a leaking supply line or bad grading, doesn’t get fixed alongside the mold cleanup.
How Do You Keep Mold From Coming Back?
Prevention comes down to controlling moisture at the source and giving the crawl space a way to stay dry once it is. A handful of fixes do most of the work here.
- Install a vapor barrier of at least 6 mil thickness (10 mil or heavier for durability), with seams overlapped and taped, and the edges run up the foundation wall rather than just laid flat on the dirt.
- Choose encapsulation over a traditionally vented design in humid climates, since humid outside air condensing on cool framing is one of the most common failure modes of vented crawl spaces.
- Size and place a dehumidifier for the actual square footage and moisture load of the space, not a generic unit grabbed off a shelf.
- Favor closed-cell foam insulation over fiberglass batts in persistent-moisture settings, since fiberglass holds water against wood rather than shedding it.
- Fix exterior grading and clean out gutters so water moves away from the foundation instead of pooling against it.
Pro Tip: Grading and gutter fixes are often the cheapest line item on a remediation estimate and the one most likely to prevent a repeat visit. Don’t let them get skipped in favor of the more visible interior work.
A properly installed vapor barrier genuinely changes the moisture math in a crawl space, and it’s worth confirming coverage and condition even on a property that looks fine from the access hatch.
When Should You Call a Licensed Mold Inspector?
A general home inspection touches the crawl space, but a dedicated crawl-space mold inspection goes deeper, and for a property with any history of moisture, leaks, or musty odor, that extra scope is worth building into your due diligence.
A solid inspection report should hand you timestamped quadrant photos, moisture-meter readings shown in-frame at each location, thermal images of any anomalies, vapor-barrier coverage documentation, and an executive summary that separates active findings from historical ones. That last part matters most in a negotiation. “Active moisture at 22% in the northeast quadrant” gives you something concrete to work with; “some staining noted” does not.
Add-on costs for this kind of focused crawl-space inspection typically run in the $100 to $300 range, with full lab sampling adding another $200 to $500 when documentation for resale, insurance, or symptom investigation justifies it. Before hiring anyone, ask about their independence from any remediation company they might recommend, how they document sample handling, and whether their report format separates active from historical findings clearly. A vague verbal summary with no photos or readings is a red flag worth walking away from.
Upchurch Inspection’s own crawl-space mold inspection add-on runs in the $200 to $600 range and includes a full moisture map alongside the photo and reading documentation described above.
How Do You Safely Access a Crawl Space Before Inspecting It?
Getting into a crawl space safely starts before you ever open the hatch. Check that the access point is clear of debris and large enough to move through without forcing your way past insulation batts or ductwork, since tearing something on the way in creates a new problem on top of whatever you’re checking. Bring a flashlight or headlamp rather than relying on any light already down there, and test that the ground beneath the entry point is stable before putting your full weight on it.
For anyone doing more than a quick visual check from the hatch, a respirator rated for mold and dust, disposable gloves, and eye protection are the minimum. Coveralls or old clothes you’re willing to throw away afterward help too, since crawl-space dust and insulation fibers cling to fabric. Kneepads or a furniture dolly to slide on make a real difference on rough subfloor or exposed piers.
Before entering, scan for obvious hazards: standing water, exposed wiring, sagging ductwork, or signs of pest activity like wasp nests or rodent burrows. Any of these is a reason to stop and bring in a licensed contractor or pest professional rather than pushing forward. Turn off the crawl space light or check that any electrical work has been de-energized if you’ll be working near it. Once inside, move in one direction methodically, quadrant by quadrant, so nothing gets missed and no area gets checked twice while others go untouched. Keep a phone or radio within reach in case you need help, especially in larger commercial crawl spaces where you might be fifty feet from the nearest exit point.
How Do You Contain Mold Spread During Remediation?
Containment during remediation exists for one reason: to keep disturbed mold spores from migrating into the living space above or into unaffected sections of the crawl space itself. Cutting into moldy insulation or scraping growth off a joist releases spores into the air, and without a barrier, HVAC returns or gaps around plumbing penetrations can pull that air straight into the house.
Sealing HVAC vents and returns that run through or near the crawl space is one of the first steps, usually with heavy plastic sheeting and tape rather than anything permanent. If the crawl space has multiple access points, closing off all but one during active work limits how far disturbed air can travel. Where the affected area is limited to one section, hanging plastic sheeting between that zone and the rest of the crawl space creates a rough containment barrier, similar to what’s used in attic or basement mold work, though a full negative-air setup with an exhaust fan venting outside is standard for larger jobs.
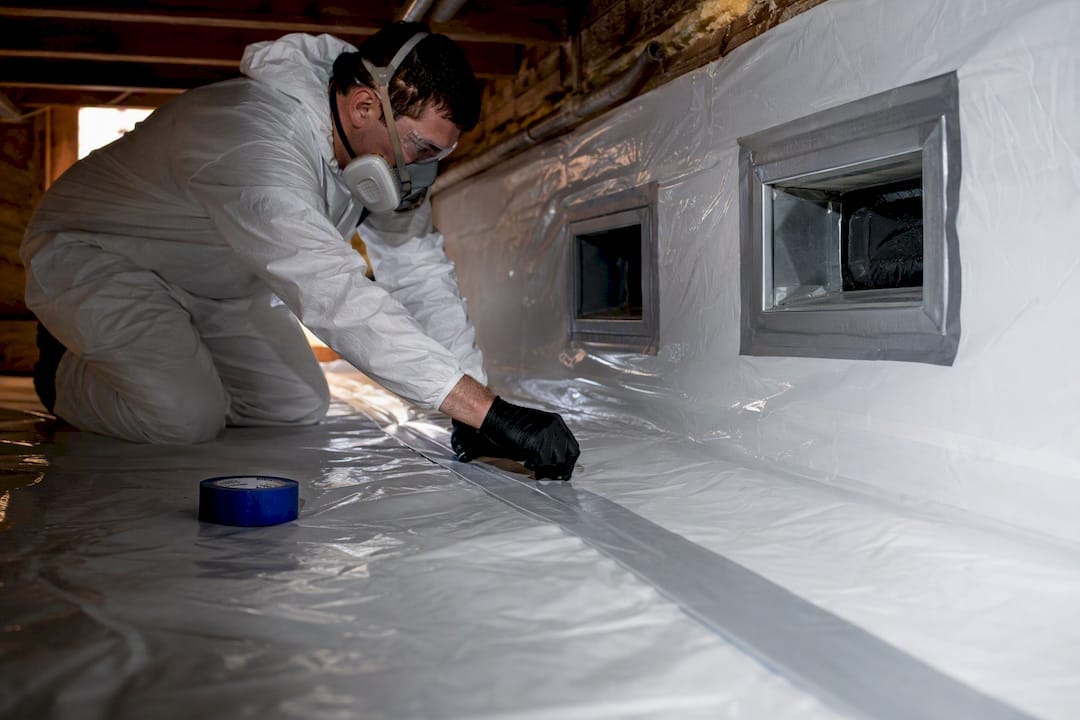
Anyone working inside the containment zone should keep respiratory protection on for the duration, and materials removed during remediation, like torn-out insulation or damaged wood, should go straight into sealed bags rather than getting carried loose through the house. Once the work is done, a final visual and moisture check confirms the area is dry and clear before containment comes down. This isn’t a step to skip on the assumption the mold was minor. Even a modest patch disturbed without containment can seed spores into insulation, ductwork, or wall cavities well beyond the original footprint.
Field-Informed Takeaway From Holly at Upchurch Inspection
My advice: document, measure, and prioritize repairs by moisture readings and photos, not panic. Use those findings to negotiate credits or repairs, and always fix the moisture source first.
— Holly
Get a Crawl-Space Mold Inspection Before You Close
If you’re weighing whether to handle crawl-space concerns yourself or bring in a specialist, the honest answer is that a general walkthrough rarely gives you the moisture data you need to negotiate confidently. A crawl-space mold inspection add-on typically priced between $200 and $600 can provide buyers, owners, and investors across the Mid-South a full moisture map, quadrant photo documentation, and an executive summary that draws a clear line between active and historical findings, not a vague verbal impression. That documentation is what turns a mold concern into a specific repair credit or a informed pass on a deal. If you’re already scheduling a broader property condition assessment for a commercial purchase, the crawl-space add-on layers directly into that scope. Reach out to schedule the inspection alongside your standard purchase inspection, and get the moisture data before you’re negotiating blind.
Primary Sources and Further Reading
Guidance in this article draws on the EPA’s mold and moisture resources, CDC health guidance on mold exposure, and inspection-industry cost and methodology data from InspectandTest.
This article is general information, not a substitute for advice from a qualified doctor. Consult a qualified healthcare professional about your own circumstances before acting on anything here.
Sources
- A brief guide to mold, moisture and your home | US EPA
- Mold | About Mold and Health | CDC
- Crawl Space Mold Inspection: A Buyer Cost and Scope Guide – InspectandTest
FAQ
How Serious Is Mold in a Crawl Space?
It depends on whether it’s active or historical. Ongoing active growth tied to a current moisture source is a genuine structural and air-quality concern, while small, dry, historical staining from a resolved leak is much lower priority, according to CDC guidance on removing visible mold and fixing the moisture problem behind it.
Will Homeowners Insurance Cover Mold in a Crawl Space?
Most standard homeowners policies exclude mold damage caused by long-term neglect or gradual leaks, though coverage sometimes applies if the mold resulted from a sudden, covered event like a burst pipe. Check your specific policy language, since exclusions and exceptions vary significantly by insurer.
What Are the Warning Signs of Mold Exposure?
Common symptoms linked to damp, moldy environments include nasal congestion, coughing, throat irritation, eye irritation, and worsened asthma symptoms in sensitive individuals, per CDC and NIOSH research on damp indoor environments. Fixing the underlying dampness is more effective for preventing these symptoms than relying on air sampling alone.
How Much Does It Cost to Remove Mold From a Crawl Space?
Small, isolated cleanups can run a few hundred dollars, while full encapsulation with structural repairs can reach several thousand depending on square footage and damage extent. A dedicated inspection add-on to assess the scope first typically costs $200 to $600, which helps avoid paying for remediation you don’t actually need.


