
Purchasing a vehicle is a major financial decision, second only to buying a home for most people. While a car might look pristine on the dealer's lot or in an owner's driveway, underlying mechanical, electrical, or structural issues can quickly turn a great deal into a costly burden. This is precisely why a comprehensive pre purchase inspection checklist is not just a recommendation; it's an essential part of the buying process. It empowers you to move beyond the shiny paint and clean interior to assess the vehicle's true condition.
This guide serves as your strategic roadmap, breaking down the complex process into a structured, manageable evaluation. We will systematically cover the 10 critical areas every prospective buyer must examine, from the engine's health to the integrity of the electrical systems. The goal is to equip you with the knowledge to identify potential red flags, understand the importance of vehicle history, and make an informed decision with confidence. The principles of a thorough inspection are universal for significant investments. For instance, just as you'd meticulously check a car's mechanics, a smart homebuyer would use a detailed homebuyer roof inspection checklist to evaluate a property's most critical protective barrier. This checklist is designed to help you avoid common pitfalls and ensure your next vehicle is a reliable asset, not a surprise liability.
1. Exterior Body and Paint Condition
A vehicle's exterior is its first line of defense and a direct reflection of its history. A comprehensive assessment of the body and paint is a critical first step in any pre-purchase inspection checklist, revealing everything from past accidents to the quality of care it has received. This inspection goes beyond a simple walk-around; it’s a detailed analysis of panel alignment, paint quality, and signs of corrosion that can indicate deeper, more expensive problems.
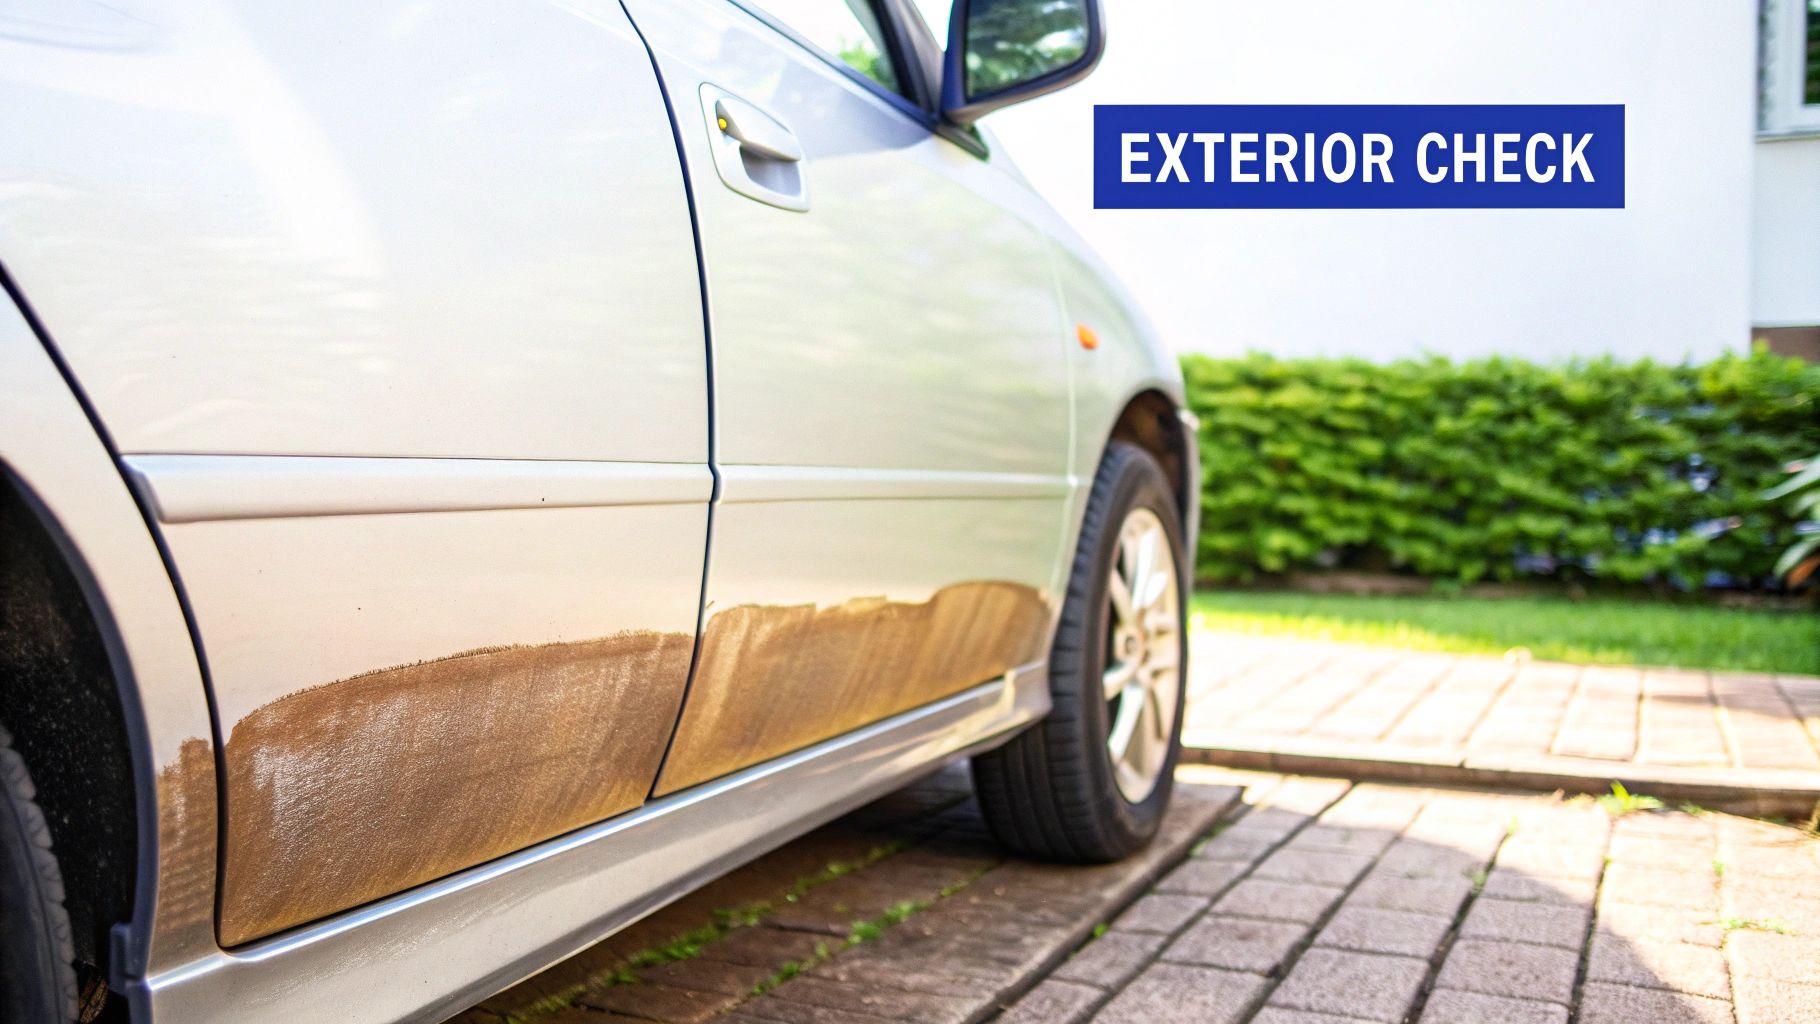
Leading automotive inspection services, from AAA's pre-purchase protocol to CarMax's Certified Pre-Owned program, place heavy emphasis on this step. They often use specialized tools like paint depth gauges to detect non-factory paint jobs, a tell-tale sign of collision repair. Inconsistent paint texture, color mismatch between panels, or overspray on trim are red flags that warrant a closer look.
Why It's a Crucial First Step
The exterior condition provides a roadmap for the rest of your inspection. Evidence of a front-end collision, for instance, should prompt you to pay extra attention to the radiator, engine mounts, and frame alignment. Similarly, rust on the lower body panels or wheel wells can signal potential undercarriage corrosion, a major structural concern. Identifying these issues early helps you understand the vehicle’s true story, not just the one presented by the seller. Just as certain exterior defects can impact a home's longevity, a car's outer shell protects its vital systems. You can learn more about how exterior issues affect structural integrity to understand this parallel.
Actionable Inspection Tips:
- Inspect in Bright, Natural Light: Artificial lighting can hide scratches, swirls, and color mismatches. Always view the vehicle outdoors during the day.
- Check Panel Gaps: The spaces between doors, fenders, the hood, and the trunk should be uniform. Uneven gaps are a classic sign of poor-quality repair work or frame damage.
- Look for Overspray: Carefully check window seals, plastic trim, and wheel wells for specks of paint. This indicates a recent paint job that may be hiding damage.
- Magnet Test: A simple refrigerator magnet can help identify body filler (like Bondo). The magnet will not stick to areas with thick filler underneath the paint.
2. Engine and Mechanical Components
The engine is the heart of any vehicle, and its health is the single most important factor in determining future reliability and operating costs. A thorough mechanical inspection goes far beyond simply starting the car; it’s a systematic evaluation of the engine, transmission, and associated components to uncover hidden issues that could lead to catastrophic failure. This part of a pre-purchase inspection checklist is non-negotiable for understanding the vehicle's true mechanical soundness and remaining lifespan.
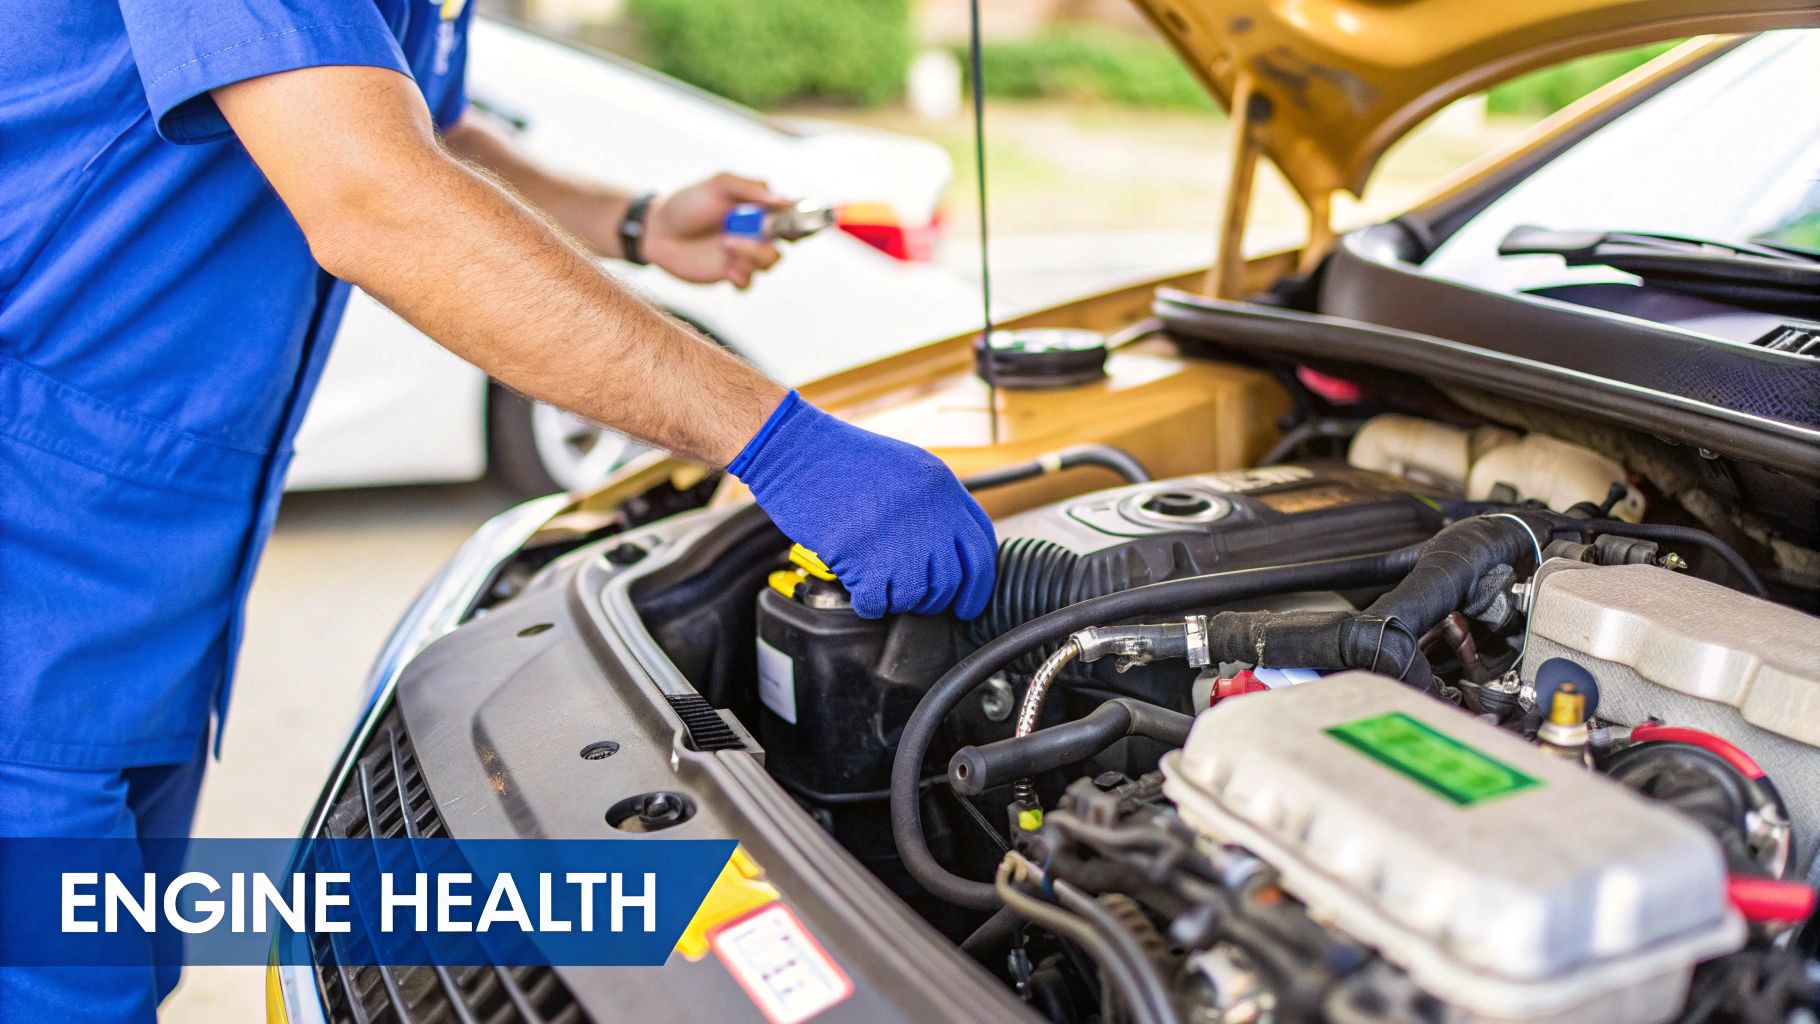
Reputable inspection services, from those offered by ASE Certified Technicians to comprehensive programs like Firestone Complete Auto Care, prioritize engine diagnostics. They often utilize computerized scanners to read diagnostic trouble codes (DTCs) and may perform compression tests to assess internal engine health. Edmunds' certified pre-owned criteria, for instance, often includes rigorous mechanical checks to ensure the engine operates within factory specifications, providing a benchmark for what a quality inspection entails.
Why It's a Crucial Step
The engine's condition directly impacts performance, fuel economy, and potential repair bills. A minor oil leak could be a simple gasket replacement or a sign of a more severe internal problem. Similarly, a timing belt that is due for replacement can be a major negotiating point, as failure can cause thousands of dollars in engine damage. Identifying these mechanical needs before purchase transforms them from future surprise expenses into known variables you can use to make an informed decision or negotiate a better price.
Actionable Inspection Tips:
- Scan for Codes: Ask the seller or your mechanic to scan the onboard computer for any stored or pending diagnostic trouble codes (DTCs), even if the check engine light is off.
- Listen Closely: Start the engine from cold and listen for any unusual knocking, ticking, or grinding sounds. These noises can indicate serious issues like rod knock or valve train problems.
- Check Fluids: Inspect the engine oil for a milky appearance (a sign of a coolant leak) and the transmission fluid for a burnt smell. All fluids should be at their proper levels.
- Inspect Belts and Hoses: Look for cracks, fraying, or bulging on all visible belts and hoses. A broken serpentine belt can leave you stranded instantly.
3. Transmission and Drivetrain
The transmission and drivetrain are the heart of a vehicle's power delivery system, and any issues here can lead to some of the most complex and expensive repairs. A thorough check of these components is a non-negotiable part of any pre-purchase inspection checklist. This step involves evaluating the transmission's fluid, its shifting behavior, and the condition of related drivetrain parts like the driveshaft and differentials. It reveals how the car has been driven and maintained, and whether a catastrophic failure is looming.
Reputable automotive authorities, from Consumer Reports in their used car guides to specialized services like AAMCO, prioritize transmission diagnostics. Their evaluations often involve not just a physical check but also scanning the vehicle's computer for stored fault codes that may not have triggered a check engine light. A clean bill of health from these systems is a strong indicator of a well-maintained vehicle, while any red flags demand immediate attention from a specialist.
Why It's a Crucial Step
The drivetrain's condition directly impacts a vehicle's reliability and performance. A failing transmission can leave you stranded without warning, and a full replacement can often cost thousands of dollars, sometimes exceeding the value of the car itself. Spotting warning signs like fluid leaks, harsh shifting, or strange noises during a test drive allows you to either walk away from a bad deal or negotiate a significant price reduction to cover the cost of future repairs. Ignoring these signs is a high-risk gamble that rarely pays off for the buyer.
Actionable Inspection Tips:
- Check the Transmission Fluid: With the engine warm and running (on most vehicles), check the transmission fluid dipstick. The fluid should be bright red or pink, not dark brown or black.
- Smell the Fluid: A burnt toast smell indicates overheating and excessive friction within the transmission, a major red flag.
- Test Drive for Smoothness: During the test drive, pay close attention to how the car shifts gears. It should be smooth and decisive, without hesitation, clunking, or shuddering.
- Listen for Noises: Turn the radio off and listen for any whining, humming, or grinding sounds that change with vehicle speed or during shifts. These can indicate worn bearings or damaged gears.
- Request a Computer Scan: Ask the seller if you can have the vehicle's onboard computer scanned for any transmission-specific diagnostic trouble codes (DTCs).
4. Suspension and Steering Systems
A vehicle’s suspension and steering systems are fundamental to its safety, comfort, and handling. This part of a pre-purchase inspection checklist involves a close look at the components that connect the car to its wheels, such as shocks, struts, control arms, and tie rods. A thorough evaluation here reveals how the vehicle will respond on the road, absorb impacts, and maintain control, directly impacting driver confidence and passenger safety.
Major service centers like Monro Muffler Brake & Service and Firestone Complete Auto Care have built their reputations on expertise in these systems, making them a standard part of any comprehensive vehicle check. They understand that worn suspension components not only create a harsh ride but can also accelerate wear on other critical parts, especially tires. A professional inspection often includes putting the vehicle on a lift to check for leaks, damaged bushings, and excessive play in the steering linkage.
Why It's a Crucial Safety Check
The condition of the suspension and steering is non-negotiable for vehicle safety. Worn shocks or struts can increase stopping distances, while a loose tie rod can lead to a complete loss of steering control. Issues in these systems often develop gradually, making them less obvious to an inexperienced driver. Identifying a clunking noise over bumps or excessive steering wheel vibration early can prevent a dangerous failure and a costly repair bill down the road. This check provides critical insight into the vehicle's structural and mechanical soundness.
Actionable Inspection Tips:
- Perform the "Bounce Test": Press down firmly on each corner of the vehicle and release. The car should rebound once and settle. If it continues to bounce, the shocks or struts are likely worn.
- Check for Uneven Tire Wear: Scalloped or cupped patterns on the tires are a classic symptom of failing suspension components.
- Listen for Noises: During your test drive, listen for clunking, creaking, or groaning sounds when turning or driving over bumps and uneven pavement.
- Test Steering Response: The steering should feel tight and responsive. Excessive "play" or looseness in the wheel before the tires turn indicates wear in the steering system.
- Visual Leak Inspection: Look for signs of fluid leaking from the shock or strut bodies. Any oily residue is a clear sign that they need replacement.
5. Brake System Inspection
A vehicle's brake system is arguably its most important safety feature, making its thorough evaluation a non-negotiable part of any pre-purchase inspection checklist. This assessment goes far beyond simply seeing if the car stops; it involves a detailed check of all components, including pads, rotors, calipers, brake lines, and the master cylinder. A compromised brake system not only puts you at risk but can also lead to immediate and expensive repairs.
Leading authorities in automotive safety and service, from Brembo's high-performance standards to the comprehensive checks performed by AAA and Firestone, prioritize a detailed brake inspection. These experts understand that visible wear on pads and rotors tells only part of the story. They also look for corroded brake lines, dirty or low brake fluid, and sticking calipers, all of which are critical indicators of the system's overall health and the vehicle's maintenance history.
Why It's a Crucial Safety Check
The condition of the brake system provides direct insight into how the vehicle was maintained and its readiness for the road. Worn-out components are a clear sign that a significant service bill is looming. More importantly, issues like a soft brake pedal, pulling to one side during braking, or grinding noises are immediate safety hazards. Identifying these red flags prevents you from purchasing a vehicle that could fail in a critical moment, protecting both your investment and your well-being. Think of it like checking a home's foundation; a flaw in this core system compromises everything else. You can see how structural issues impact safety to understand this vital parallel.
Actionable Inspection Tips:
- Check Pad Thickness: Look through the wheel spokes to see the brake pads. They should have more than 1/4 inch of material remaining.
- Inspect Rotors: The rotor surface should be smooth. Deep grooves, scoring, or a "wavy" feel are signs they need replacement.
- Examine Brake Fluid: Locate the brake fluid reservoir. The fluid should be clear to light amber. Dark, murky fluid indicates it's old and contaminated.
- Listen and Feel: During the test drive, pay close attention. Listen for any high-pitched squealing or deep grinding noises. Feel for any vibration or pulsing in the pedal when you apply the brakes.
- Test the Parking Brake: On a safe incline, engage the parking brake fully. It should hold the vehicle firmly in place without any slippage.
6. Electrical System and Battery
A modern vehicle’s electrical system is its central nervous system, controlling everything from the engine's spark plugs to the infotainment screen. A thorough check of the battery, alternator, starter, and wiring is a non-negotiable part of any pre-purchase inspection checklist. Seemingly minor glitches, like a slow power window or dimming headlights, can be early warnings of a failing alternator or a parasitic drain that could leave you stranded.
Professional diagnostic services, like those offered by AutoZone or Advance Auto Parts, often include free battery and charging system tests. These evaluations go beyond a simple voltage reading, performing a "load test" to simulate the strain of starting the engine. This test reveals the battery's true health and its ability to hold a charge under pressure, a critical detail often missed in a basic visual check.
Why It's a Crucial Check
The electrical system's health is fundamental to a vehicle's reliability. A failing battery is a straightforward fix, but if a faulty alternator or bad wiring is the root cause, repair costs can escalate quickly. Damaged or frayed wiring can also pose a significant safety hazard. Just as faulty wiring in a house presents risks, a vehicle’s electrical issues can lead to unpredictable failures. You can discover more about how electrical problems are identified in property inspections to see the parallels in diagnostic importance.
Actionable Inspection Tips:
- Request a Battery Load Test: A simple voltage check isn't enough. Insist on a load test to confirm the battery’s ability to perform under stress.
- Inspect Terminals and Cables: Look for white or greenish, crusty buildup (corrosion) on the battery terminals. Ensure all connections are tight and the cables are not frayed or cracked.
- Test All Electronics: Systematically check every electronic function: headlights (low and high beams), turn signals, power windows, locks, seats, sunroof, radio, and wipers.
- Look for Warning Lights: When you start the car, check that all dashboard warning lights illuminate briefly and then turn off. A light that stays on (like the battery or check engine light) indicates a problem.
7. Tires and Wheels
Often overlooked in a casual walk-around, the tires and wheels are safety-critical components that offer deep insights into a vehicle's maintenance history and potential underlying issues. A thorough evaluation of the tires, tread, and wheel condition is an essential part of any pre-purchase inspection checklist. Worn or damaged tires are not just a significant replacement expense; they can reveal hidden problems with the vehicle's alignment, suspension, and overall drivability.
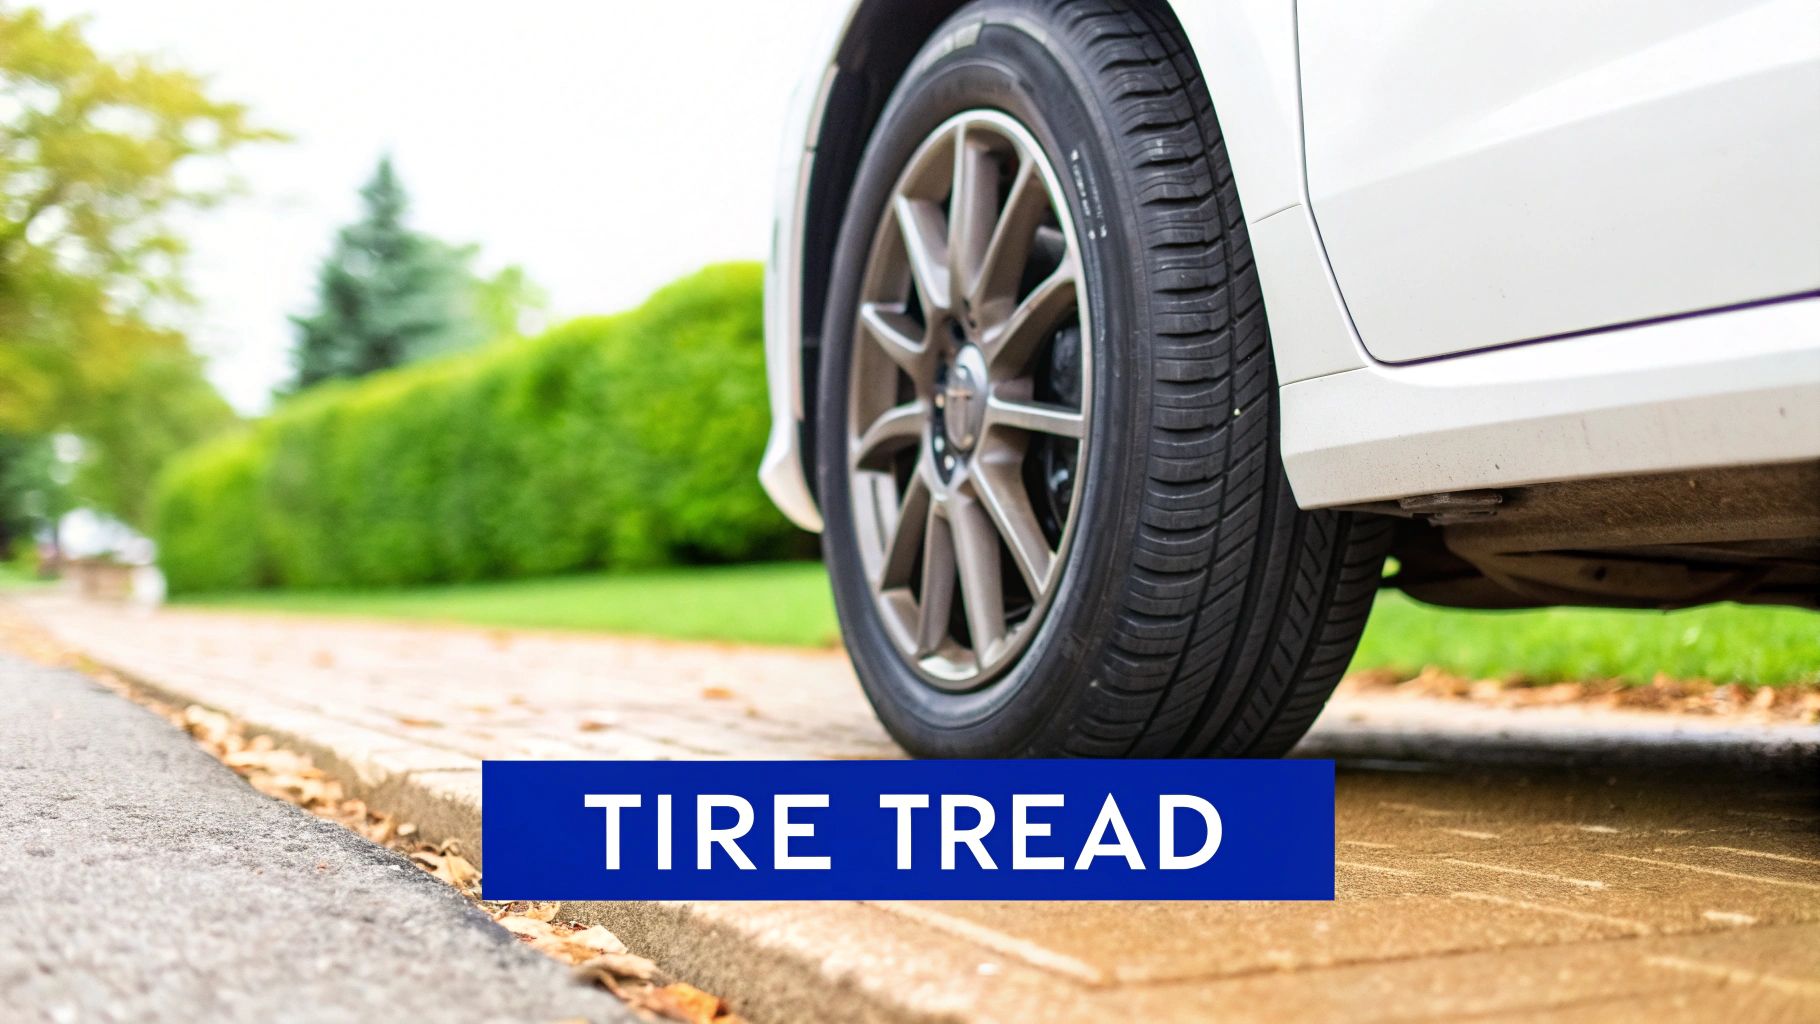
Industry leaders like Michelin and guides from retailers such as Tire Rack have established clear standards for what constitutes a safe and well-maintained tire. Used car dealerships and certified pre-owned programs prominently feature tire condition in their inspections because they understand its direct impact on safety and buyer confidence. This step goes beyond simply kicking the tires; it’s a detailed examination that protects both your safety and your wallet.
Why It's a Crucial Safety Check
The condition of the tires provides a direct window into the health of the car's suspension and alignment systems. Uneven wear patterns are a major red flag, pointing to problems that can affect handling, fuel economy, and safety. A brand-new set of tires on a used car isn't always a good sign either; it could be a tactic to hide severe alignment issues. Identifying these problems before purchase prevents you from inheriting expensive repairs for shocks, struts, or frame adjustments.
Actionable Inspection Tips:
- Perform the Penny Test: Measure tread depth by inserting a penny into the tread grooves with Lincoln's head upside down. If you can see the top of his head, the tread is worn to or below the legal limit of 2/32" and needs immediate replacement.
- Analyze Wear Patterns: Look for uneven wear. Wear on the outer edges suggests under-inflation, center wear indicates over-inflation, and wear on just one edge points to alignment problems.
- Check the Tire Age: Find the DOT code on the sidewall. The last four digits represent the week and year of manufacture (e.g., "3521" is the 35th week of 2021). Tires over six years old should be replaced, regardless of tread depth.
- Inspect the Sidewalls and Wheels: Carefully examine the sidewalls for cracks, bulges, or gashes. Check the wheels for curb rash, cracks, or bends, as this can affect the tire's seal and the vehicle's alignment. Don't forget to check the spare tire's condition and pressure.
8. Fluid Levels and Condition
A vehicle's fluids are its lifeblood, crucial for cooling, lubrication, and hydraulic functions. A thorough check of these fluids is a non-negotiable part of any pre-purchase inspection checklist, offering a transparent view into the engine's health and the vehicle's maintenance history. This inspection involves more than just looking at the dipstick; it’s an analysis of the color, consistency, and smell of each vital fluid, which can reveal hidden mechanical issues before they become catastrophic failures.
Major automotive service providers like Valvoline and Mobil 1 have popularized fluid analysis as a primary diagnostic tool. Professional mechanics and dealership service centers rely on these checks as a first step in diagnosing engine and transmission problems. Dark, gritty engine oil, milky coolant, or burnt-smelling transmission fluid are immediate red flags that signal internal wear, contamination, or overheating, indicating a history of neglect or severe use.
Why It's a Crucial Diagnostic Step
Fluid condition provides a direct insight into the internal state of a vehicle’s most expensive components. While a clean exterior can be deceiving, the state of the engine oil, coolant, and transmission fluid cannot lie. For example, a white, milky appearance on the oil cap suggests a potential head gasket leak, a very costly repair. Similarly, dark and sludgy transmission fluid points to internal wear that could lead to a complete transmission failure down the road. Identifying these issues is essential for gauging future reliability and avoiding thousands in unexpected repair bills.
Actionable Inspection Tips:
- Check When Cold: For the most accurate readings, check fluids like engine oil and coolant when the engine is cold and has been sitting on a level surface.
- Observe Oil Condition: Fresh engine oil should be a translucent amber color. If it's black, gritty, or has a burnt smell, it indicates overdue oil changes or potential engine problems.
- Inspect the Coolant: The coolant in the reservoir should be the color specified by the manufacturer (often green, orange, or pink) and free of rust or oil.
- Examine Transmission Fluid: Check the transmission fluid (often with the engine running, per manufacturer instructions). It should be reddish-pink and smell sweet. A dark brown color or burnt toast smell is a major warning sign.
- Look for Leaks: After the test drive, park the car on a clean surface and check underneath for any fresh drips of oil, coolant, or other fluids.
9. Interior Condition and Functionality
The interior of a vehicle is where the driver and passengers spend their time, making its condition and functionality just as important as the mechanical components. A thorough interior inspection provides clues about the owner's care habits, reveals hidden issues like water damage, and ensures all comfort and safety features work as intended. This part of the pre-purchase inspection checklist involves more than just a glance; it's a hands-on test of every button, switch, and surface.

Reputable assessment standards, such as those used by CarMax and detailed in Kelley Blue Book's condition ratings, place significant weight on the interior. They understand that worn-out seats, a cracked dashboard, or malfunctioning electronics can significantly detract from a vehicle's value and user experience. A pristine interior often correlates with diligent overall maintenance, while a neglected one can be a red flag for other overlooked problems.
Why It's a Crucial Step
The interior's state can reveal costly hidden secrets. A musty smell or stained carpets under the floor mats could indicate a leaky seal or past flood damage, leading to mold and electrical gremlins. Inoperative climate controls are not just an inconvenience; they can signal expensive repairs to the A/C compressor or heater core. Just as home inspectors meticulously evaluate interior spaces for signs of trouble, a vehicle’s cabin tells a story about its history and potential future costs.
Actionable Inspection Tips:
- Test Every Button: Systematically press every switch and button on the dashboard, center console, and doors. This includes climate controls (both A/C and heat), the audio system, window switches, and power mirror adjustments.
- Check for Water Damage: Lift the floor mats and press on the carpet to feel for dampness. Look for water stains on the headliner, seats, and door panels, and be wary of any musty or mildew odors.
- Inspect Upholstery: Examine all seats for tears, burns, stains, and excessive wear. Check that seat adjustments (manual or power) function correctly in all directions.
- Verify Lights and Gauges: Turn the ignition on and ensure all dashboard warning lights illuminate and then turn off. Check all interior lights, including the dome light, map lights, and vanity mirror lights.
10. Vehicle History and Documentation
While a physical inspection tells you about a vehicle's present condition, its documentation tells the story of its past. A comprehensive review of a vehicle's history report, service records, and title status is a non-negotiable part of any pre-purchase inspection checklist. This paper trail can uncover hidden issues like rolled-back odometers, salvage titles, or undisclosed accidents that a visual inspection might miss, saving you from a potentially disastrous purchase.
Services like Carfax and AutoCheck have become industry standards by compiling data from thousands of sources, including DMVs, insurance companies, and repair shops. They provide a timeline of a car’s life, detailing ownership changes, accident reports, service entries, and potential red flags like flood damage or lemon law buybacks. Cross-referencing this report with the seller’s provided maintenance logs and the physical state of the car creates a complete picture of its health and history.
Why It's a Crucial Step
The vehicle's documentation validates everything you see during the physical inspection. A car that looks pristine but has a history of major accidents or a branded title (like "salvage" or "rebuilt") is a significant risk. This step helps you verify the seller's claims and understand the car's true value and potential long-term reliability. Just as a property's title and deed history are critical in real estate, a car's paperwork is essential for a secure investment. Understanding the importance of clear documentation can prevent future complications.
Actionable Inspection Tips:
- Run a Vehicle History Report: Always get a Carfax or AutoCheck report. It is the single most important piece of documentation you can obtain.
- Verify the VIN: Ensure the Vehicle Identification Number (VIN) on the dashboard, driver's door jamb, and title all match the number on the history report.
- Check for Open Recalls: Use the VIN to check for any outstanding safety recalls on the National Highway Traffic Safety Administration (NHTSA) website.
- Review Service Records: Ask the seller for all maintenance and repair receipts. Consistent, documented service is a strong indicator of a well-cared-for vehicle.
- Analyze the Title: Confirm the title is "clean" and free of liens or brands like "salvage," "rebuilt," or "flood damage."
10-Point Pre-Purchase Inspection Comparison
| Checkpoint | Implementation Complexity (🔄) | Resource Requirements (⚡) | Expected Outcomes (📊) | Ideal Use Cases (💡) | Key Advantages (⭐) |
|---|---|---|---|---|---|
| Exterior Body and Paint Condition | 🔄 Moderate — visual + paint-meter; requires daylight | ⚡ Paint depth gauge, good lighting; 15–20 min | 📊 Detects repaints, dents, rust; flags accident/structural issues | 💡 Used-car purchases, CPO verification, seller disclosure checks | ⭐ Identifies maintenance/accident history early |
| Engine and Mechanical Components | 🔄 High — expert diagnosis, compression tests | ⚡ Diagnostic scanner, compression tester, tools; 30–45 min | 📊 Reveals leaks, wear, DTCs; estimates remaining life | 💡 High-mileage buys, reliability verification, price negotiation | ⭐ Prevents costly unexpected repairs; shows true engine health |
| Transmission and Drivetrain | 🔄 High — warm-up/test-drive; may need internal diagnosis | ⚡ Test drive, fluid check, transmission scan; 20–30 min | 📊 Identifies shifting faults, fluid degradation, costly failures | 💡 Trucks/SUVs, AWD/4WD vehicles, vehicles with shifting symptoms | ⭐ Detects expensive faults early; indicates maintenance history |
| Suspension and Steering Systems | 🔄 Moderate — visual + dynamic tests; lift recommended | ⚡ Lift/alignment tools, test drive; 20–25 min | 📊 Finds worn shocks/arms, alignment issues, handling faults | 💡 Comfort/handling concerns, uneven tire wear, safety checks | ⭐ Directly impacts safety, ride quality, and tire life |
| Brake System Inspection | 🔄 Moderate — lift inspection and functional tests | ⚡ Lift, caliper/rotor gauges, fluid tester; 15–20 min | 📊 Assesses stopping power, pad/rotor life, leaks | 💡 Safety-critical purchases, fleet maintenance, pre-trip checks | ⭐ Predictable service needs; critical for safety compliance |
| Electrical System and Battery | 🔄 Low–Moderate — testing and scans for intermittent faults | ⚡ Multimeter, load tester, diagnostic scanner; 15–20 min | 📊 Detects battery/charging faults, lighting and wiring issues | 💡 Older vehicles, vehicles with electronic glitches | ⭐ Quick, often inexpensive fixes; prevents roadside failures |
| Tires and Wheels | 🔄 Low — visual, tread and balance checks | ⚡ Tread gauge, visual inspection, optional balancing; 10–15 min | 📊 Shows tread wear, alignment issues, rim damage | 💡 Pre-purchase checks, pre-trip inspections, alignment concerns | ⭐ Immediate safety indicator; reveals driving/maintenance patterns |
| Fluid Levels and Condition | 🔄 Low — simple checks; interpretation may require expertise | ⚡ Dipsticks, fluid analysis optionally; 10–15 min | 📊 Reveals leaks, contamination, maintenance habits | 💡 Routine pre-purchase screening, engine health baseline | ⭐ Inexpensive early warning of mechanical issues |
| Interior Condition and Functionality | 🔄 Low — visual and functional checks | ⚡ Light, time to test switches/controls; 15–20 min | 📊 Reveals wear, water damage, faulty controls/airbags | 💡 Assessing vehicle care, detecting hidden water/accident damage | ⭐ Reflects overall care; exposes cosmetic and functional issues |
| Vehicle History and Documentation | 🔄 Low — document review and VIN verification | ⚡ Carfax/AutoCheck, VIN checks, service records; 20–30 min | 📊 Reveals title status, accidents, ownership and recalls | 💡 All used-car purchases, fraud prevention, recall checks | ⭐ Prevents fraud; identifies major past incidents and liens |
From Checklist to Closing: Making Your Inspection Work for You
You've navigated the comprehensive pre-purchase inspection checklist, moving from the foundational piers all the way up to the roofing shingles. This journey isn't just about identifying a property's flaws; it's about gaining a deep, holistic understanding of what is likely the largest investment you will ever make. The goal is to transform uncertainty into clarity, empowering you to move forward with absolute confidence.
Completing the checklist is a critical milestone, but the true power lies in what you do next. Your inspection report is far more than a simple list of defects. It is a strategic tool, a future maintenance roadmap, and your best leverage in the final stages of a real estate transaction.
Turning Information into Action
The immediate value of your inspection report is its role in negotiations. A detailed, professionally documented report provides objective evidence to support your requests. It's not about winning an argument; it's about reaching a fair agreement based on the property's true condition.
- Request for Repairs: For significant issues like an active plumbing leak, faulty wiring, or a malfunctioning HVAC unit, you can request that the seller complete the repairs before closing.
- Seller Credits: If you prefer to manage the repairs yourself with your own chosen contractors, you can negotiate for a seller credit. This is a lump sum paid by the seller at closing to cover the estimated cost of the necessary work.
- Price Adjustment: For major, systemic problems like widespread foundation settlement or a roof at the end of its life, a reduction in the overall purchase price may be the most appropriate solution.
Key Insight: The most effective negotiations are based on data, not drama. Presenting findings from a certified inspector's report removes emotion and focuses the conversation on the tangible facts of the property's condition.
The Inspection Report as Your Homeowner's Manual
Beyond the closing table, your inspection report becomes an invaluable, personalized guide to homeownership. It's a snapshot in time that outlines your home’s current state and helps you plan for its future. Think of it as the first chapter in your home’s maintenance story.
This document helps you prioritize immediate needs and budget for long-term upkeep. You'll know which components are brand new and which are nearing the end of their service life. This foresight prevents small issues from escalating into costly emergencies and helps you protect the long-term value of your asset. The pre purchase inspection checklist you followed provides the framework for this ongoing care.
The Upchurch Advantage in Memphis and West Tennessee
For buyers, sellers, and agents in Memphis, Bartlett, Collierville, Germantown, and across the West Tennessee region, the quality of your inspector is paramount. A rushed, surface-level inspection can leave you vulnerable to thousands of dollars in unforeseen repairs. You need a partner who combines technical expertise with a commitment to clear communication.
An inspection is not an obstacle to overcome; it is your best opportunity to secure your investment. It provides the ultimate peace of mind, confirming you've made a sound decision or giving you the critical information needed to walk away from a potential money pit. By diligently applying this pre purchase inspection checklist, you are not just buying a house; you are making an informed, strategic, and secure investment in your future.
Ready to ensure your next property investment is a secure one? The experts at Upchurch Inspection provide the most thorough and detailed pre-purchase inspections in Memphis and West Tennessee, turning our comprehensive checklist into your roadmap for success. Schedule your inspection today and gain the clarity and confidence you deserve by visiting Upchurch Inspection.