A home inspection often feels like the final exam before you can sell your house, but with a bit of prep work, it doesn’t have to be a nail-biter. Being proactive about small fixes, making sure the inspector can get to everything, and having your paperwork ready can turn a stressful event into a smooth step toward closing the deal.
Your Guide to a Stress-Free Home Inspection
Think of a home inspection less as a pass-or-fail test and more as a professional, third-party checkup on the property’s health. For sellers, it’s your chance to show off a well-cared-for home and build a solid foundation of trust with the buyer. The goal isn’t to sweep problems under the rug; it’s to address them head-on for a more transparent and predictable sale. A little effort upfront can save you a ton of time, stress, and money later.
This isn’t just a formality—it’s a standard part of nearly every real estate transaction. In fact, it’s estimated that by 2025, roughly 80% of U.S. home buyers will opt for an inspection before closing. When a lender gets involved, that figure jumps to about 83%.
And the numbers show why it’s so common: a staggering 86% of these inspections uncover at least one issue. This leads nearly 46% of buyers to head back to the negotiating table to ask for a lower price based on what the inspector finds.
Demystifying The Process
Knowing what to expect from start to finish—from prepping the house to getting the final report—can take a lot of the anxiety out of the equation.
This visual breaks down the entire home inspection journey into three simple phases: prepare, inspect, and close.

As the infographic makes clear, a successful closing starts long before the inspector ever knocks on your door. Proactive preparation from you, the seller, is absolutely critical.
An inspector’s mission is to evaluate the home’s major systems, from the foundation all the way up to the roof shingles. They are trained to spot significant defects, potential safety hazards, and major components that are nearing the end of their useful life. Their checklist typically covers:
- Structural Integrity: Foundation, walls, and framing.
- Major Systems: HVAC, electrical, and plumbing.
- Roof Condition: Shingles, flashing, and gutters.
- Safety Features: Smoke detectors, GFCIs, and handrails.
The key thing that inspectors look for are safety issues. They focus on things that are significantly deficient, unsafe, near the end of the service life, or not functioning properly.
A smooth inspection day often comes down to handling the small stuff ahead of time. I’ve created this quick-start guide to help you focus on the most important tasks before the big day.
Home Inspection Quick-Start Preparation Guide
| Area of Focus | Action Required | Why It Matters |
|---|---|---|
| Accessibility | Clear paths to the furnace, water heater, electrical panel, attic, and crawl space. | The inspector can’t check what they can’t reach. Blocked access means an incomplete report and potential delays. |
| Utilities | Ensure all utilities (water, gas, electricity) are on and functioning. | The inspector needs to test all systems. If a utility is off, they’ll have to come back, costing time and money. |
| Minor Repairs | Replace burnt-out light bulbs, fix leaky faucets, and tighten loose doorknobs. | These small fixes show pride of ownership and prevent the inspector from creating a long list of minor “nuisance” items. |
| Safety Devices | Test all smoke detectors and carbon monoxide alarms. Make sure they have fresh batteries. | This is a critical safety check. Functioning alarms are non-negotiable and one of the first things an inspector looks for. |
Taking care of these four areas is a fantastic start and will help your inspection go much more smoothly.
To truly set yourself up for success, it helps to dig a little deeper. For instance, understanding the benefits of regular roof inspections can give you insight into what a professional looks for, which is a huge part of any home assessment. When you know what inspectors prioritize, you can focus your energy where it counts, present your home in its best light, and move through the process with confidence.
The Seller’s Pre-Inspection Punch List
Knowing how to prepare for a home inspection is about more than just a quick tidy-up. It’s about putting yourself in the inspector’s shoes and methodically going through your property to fix all the little things that can add up to a big headache on the final report.
Think of this as your pre-game walkthrough. It’s your chance to spot and handle the easy stuff before it ever becomes a negotiating point. A long list of minor defects, even if they’re cheap fixes, can give a buyer the impression that the home has been neglected. By tackling these items upfront, you’re not hiding problems—you’re showcasing pride of ownership and preventing a buyer from getting spooked.
Focus on Functionality First
Before you do anything else, make sure the basic components in every single room work exactly as they should. An inspector is paid to be thorough, which means they will flip every switch, open every door, and turn on every faucet. This is where you can rack up some easy wins.
Grab a notepad and create a simple room-by-room checklist. Your mission is to find and fix those minor annoyances you’ve probably learned to live with over the years. Trust me, those are the exact things that will stand out to a fresh set of eyes.
- Doors and Windows: Do all the doors latch properly, including the closets? Any squeaks or sticking points? A quick shot of lubricant or a minor hinge adjustment usually does the trick. Don’t forget to check that every window opens, closes, and locks securely.
- Lights and Outlets: Walk through the entire house and replace every single burnt-out light bulb. An inspector can’t know if it’s a dead bulb or a wiring issue, so they have to write it up. Use a small lamp to test every electrical outlet.
- Faucets and Drains: Run the water in every sink and check for drips underneath and around the faucet base. Make sure all sinks, tubs, and showers drain without any backup. A slow drain is often a simple fix with a standard drain cleaner.
A proactive approach does more than just shorten the defect list; it builds a massive amount of trust with the buyer. When they see a home that has been meticulously cared for, it calms their nerves and makes for much smoother negotiations.
Address the Major Systems
Look, you don’t need to be an HVAC technician or a roofer to do a basic check on your home’s most critical systems. These are the high-ticket items that buyers and their inspectors zero in on, so even small, preventative actions can make a huge impact.
A clean, well-maintained utility area sends a powerful message that you haven’t ignored the heart of the home.
Your Systems Checklist:
- HVAC System: First thing’s first—replace the furnace filter. A filthy filter is one of the most common red flags for deferred maintenance. Make sure the area around your furnace and AC unit is completely clear so the inspector has easy access.
- Water Heater: Get a good look at the base of your water heater. Are there any signs of dripping or rust? Those are telltale signs of a slow leak.
- Smoke and CO Detectors: This is a big one for safety. Test every single smoke and carbon monoxide detector in the house. If one doesn’t respond immediately, pop in a new battery. No inspector will ever overlook this.
- Visible Plumbing: Scan for any active leaks or old water stains under sinks, behind toilets, and near any visible pipes in the basement or crawlspace. Address any drips you find, no matter how small they seem.
Don’t Forget the Exterior and Grounds
The inspection starts the second the inspector pulls up to the curb. That first impression matters, and the condition of the exterior can set the tone for the rest of the visit. You’ll want to pay close attention to any areas where water could find its way into your home.
- Clean out your gutters and check that the downspouts are aimed away from the foundation.
- Look for any cracked windowpanes or damaged screens.
- Trim back tree branches or shrubs that are touching the roof or siding.
- Flip on all the exterior lights to make sure they’re working.
The trend of sellers getting their own pre-listing inspection is growing, especially in hot real estate markets. It’s a smart strategy to get ahead of potential issues, which can boost a buyer’s confidence and really make a property stand out. You can find more insights on this in the 2025 home inspection industry forecast.
To make sure your prep work lines up with what buyers are actually looking for, it helps to review a guide like an ultimate due diligence checklist. This gives you a great perspective on what’s most important during the whole transaction, helping you put your energy where it counts. Once you’ve worked through this punch list, your property will be ready.
Clearing the Path for a Thorough Inspection
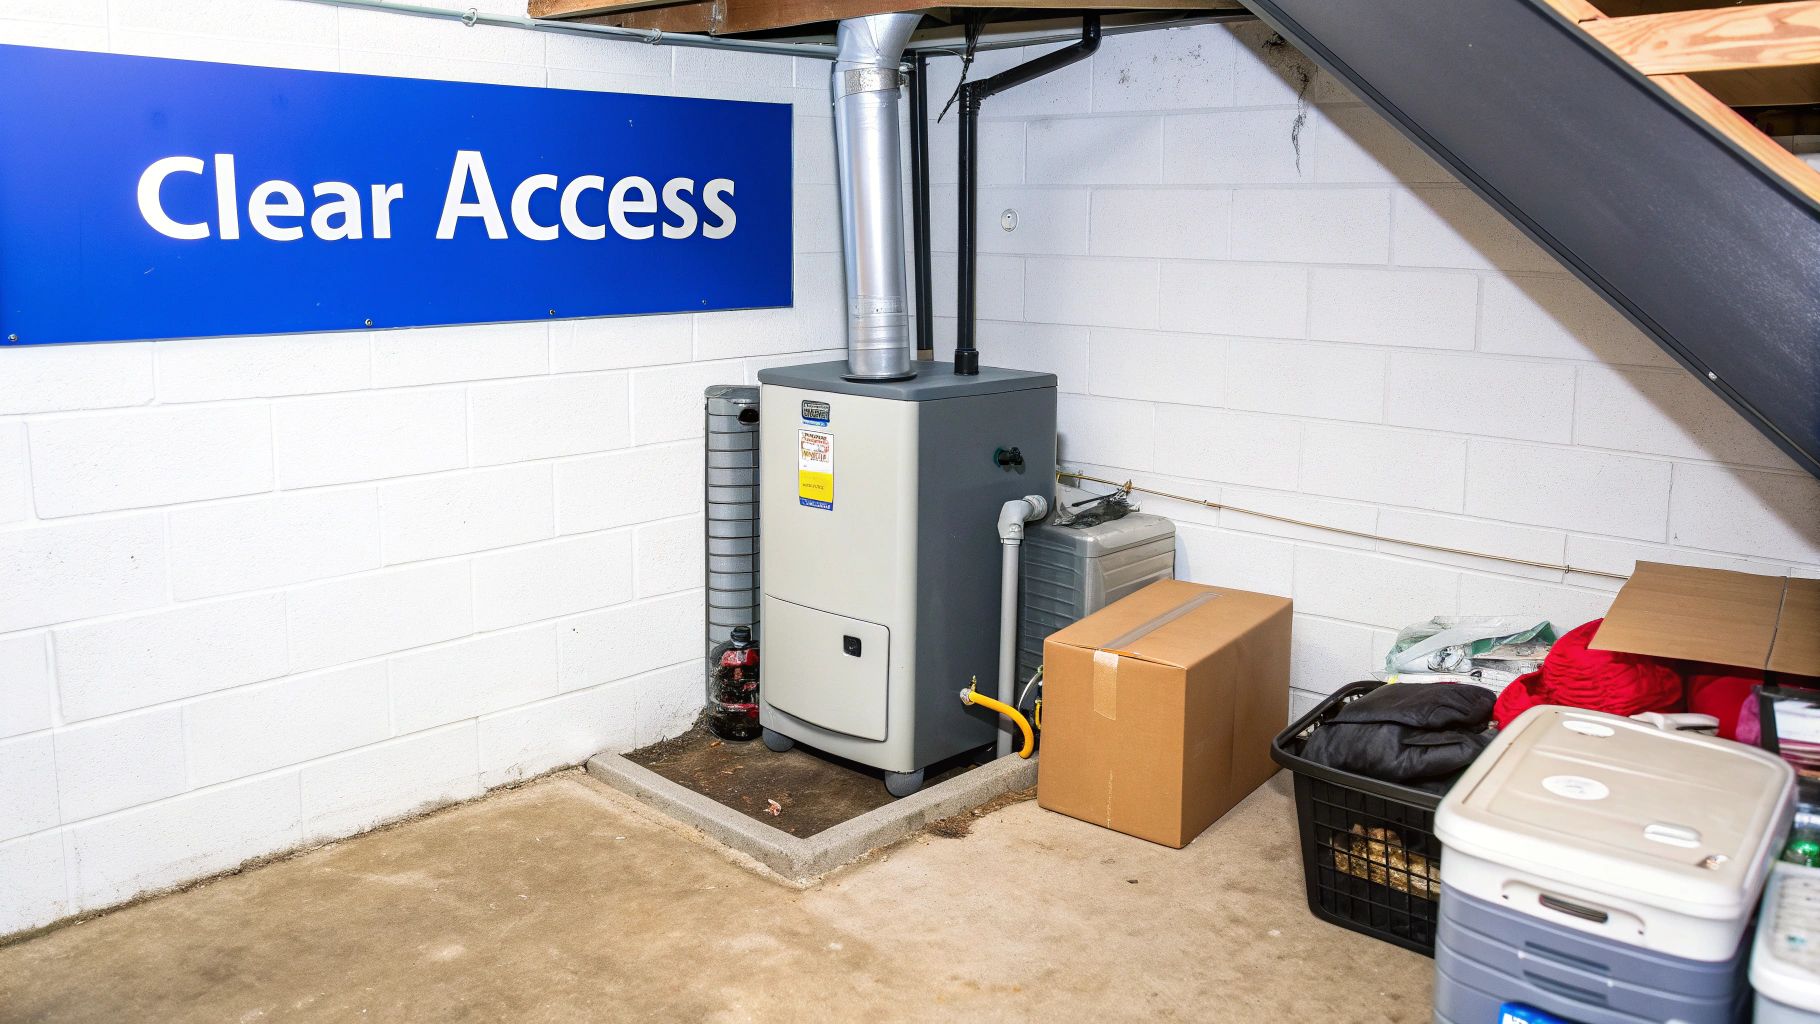
An inspector’s report is only as good as their access to your home. It’s a simple fact, but one sellers often overlook: if an inspector can’t physically get to a key system, they can’t evaluate it. This leads to frustrating gaps in the report and, sometimes, even costly re-inspections. Preparing your home means literally clearing a path for a complete and accurate assessment.

This isn’t just about being courteous; it’s a strategic move. An inspector who has to spend their time moving your boxes or squeezing past furniture might feel rushed. More importantly, blocked access means an item gets marked as “inaccessible” on the report—a red flag that creates unnecessary anxiety for the buyer.
Unlocking Key Inspection Points
Inspectors need to get up close and personal with your home’s major systems. Think about the areas you rarely go into and start there. These are often the exact spots an inspector needs to see the most.
Your goal should be to provide at least three to four feet of clear space around all critical components. This gives the inspector enough room to work safely and do their job right.
- Utility Areas: The furnace, water heater, and electrical panel are top priorities. Clear away any stored items, laundry baskets, or shelving that block a clear view and safe working space.
- Attic Hatches and Crawl Spaces: Don’t make the inspector hunt for the access point under a pile of your belongings. Ensure attic hatches are unobstructed and crawl space entrances are easy to get to.
- Garages and Basements: These areas often turn into storage units. Make sure the inspector can easily walk the perimeter to check for foundation cracks, signs of moisture, or pest activity.
I once worked with a seller whose utility closet was packed floor-to-ceiling with holiday decorations. The inspector couldn’t safely access the furnace and had to mark it as uninspected. That single oversight caused a week-long delay while the sellers cleared the space and paid for the inspector to come back out. It was a completely avoidable headache.
Creating a Safe Environment for Everyone
Logistics also extend to the occupants of your home—including pets. An inspection can be a stressful event for animals, and their presence can be a genuine safety concern for the inspector. Even the friendliest dog can get protective when a stranger starts poking around their territory.
Planning ahead for your pets lets the inspector focus on their job without distractions or potential risks.
“Plan to leave the house to give the buyer and inspector space to complete their work without distraction. Make sure to take your pets with you.”
This advice is standard practice for a reason. Taking your pets with you is the ideal solution. If that’s just not possible, here are your next-best options:
- Secure Them in a Crate: Place your pet in a crate or carrier, maybe in a room the inspector has already finished, like the garage.
- Arrange a Pet-Sitter or Daycare: A few hours of peace of mind with a friend or at a local daycare is a great move.
- Use a Secure Outdoor Space: If you have a fenced yard and good weather, this can work. Just make sure the inspector won’t need to access that area for an extended period.
By clearing both physical and personal obstacles, you’re doing more than just helping the inspector. You’re showing the buyer that you’re transparent, you care about the process, and you have nothing to hide. That sends a powerful, positive message and sets the stage for a much smoother transaction.
Organizing Your Paperwork for Inspection Day
While the physical state of your home is obviously front and center during an inspection, don’t underestimate the power of good paperwork. Organized documentation tells a story of responsible ownership, and that builds a powerful sense of trust with the buyer.
Having a folder ready with all the key documents not only makes the inspector’s job easier but also gives the buyer confidence they’re investing in a well-maintained property.
This kind of preparation can really smooth out negotiations later on. When an inspector asks about the age of the HVAC or the last time the roof was serviced, handing over a receipt with a date prevents speculation and doubt. It just shuts down a potential line of questioning before it even starts.
What to Gather Before Inspection Day
Think of this as creating your home’s professional resume. You’re highlighting its strengths and showing a clear history of care. Start by digging up any paperwork related to the big-ticket items—the major systems and any significant upgrades you’ve made.
Your goal is to anticipate the inspector’s questions and have the answers ready to go. This simple act of organization can completely change the tone of the entire inspection process from an interrogation into a collaborative review.
Here are the essentials to have on hand:
- Warranties: Pull together any active warranties for appliances, the roof, windows, or other major components. This is a huge value-add for buyers.
- Service Records: Find receipts or invoices for routine maintenance like HVAC tune-ups, chimney sweeping, septic tank pumping, or pest control treatments.
- Repair Invoices: If you’ve had major repairs done—like foundation work or a plumbing overhaul—have the paperwork showing who did the work and when.
- Renovation Permits: For any big additions or remodels, providing copies of the permits proves the work was done to code.
To make this easier, I’ve put together a quick checklist of the documents you’ll want to have organized and ready to present.
Essential Home Inspection Document Checklist
| Document Type | Examples | Benefit for Inspection |
|---|---|---|
| Warranties & Manuals | Roof, HVAC, windows, major appliances | Proves quality and offers future protection for the buyer. |
| Service & Maintenance Records | HVAC tune-ups, septic pumping, chimney sweep | Shows a history of proactive care and system upkeep. |
| Repair Invoices | Foundation repair, plumbing fixes, electrical work | Provides transparency and details on past issues. |
| Permits & Approvals | Additions, major renovations, electrical upgrades | Confirms work was completed to local building codes. |
| Blueprints & Surveys | Original home blueprints, property survey | Offers valuable information on structure and lot lines. |
Having these documents neatly organized in a binder or folder is a small detail that makes a massive professional impression.
A detailed maintenance history is a power move. It demonstrates a proactive approach to homeownership and can help justify your asking price, even if the inspection uncovers a few minor issues.
Day-Of Essentials: More Than Just Paper
Beyond your document folder, a few logistical checks on the day of the inspection are absolutely non-negotiable. These simple steps ensure the inspector can do a complete and thorough evaluation without hitting any roadblocks.
First and foremost, make sure all utilities are active. An inspector can’t test the furnace, check for hot water, or verify the outlets work if the gas, water, and power are off. If the property is vacant, double-check that everything has been turned back on well before the appointment time.
Also, take a moment to ensure all pilot lights are lit. This is a common oversight that can cause real headaches. Check appliances like:
- Gas Water Heaters
- Gas Fireplaces
- Furnaces
If an inspector can’t test a major system because a utility is off or a pilot light is out, they have to mark it as “uninspected.” This almost always means a follow-up visit is needed, which can delay closing and add unnecessary costs for everyone.
The demand for building inspectors is holding strong, with the market estimated to be around $5 billion in 2025, fueled by steady housing activity. With so much riding on this one event, making sure your home is fully operational is an easy way to keep your transaction on track. You can learn more about the costs and trends of home inspections on nar.realtor.
Understanding the Inspection Report and Negotiations
The inspection is done, and the report just hit your inbox. Take a breath. This document can look incredibly daunting at first, but it’s not a pass/fail grade—think of it as a detailed health checkup for your home, designed to give the buyer a complete picture. Let’s walk through how to read it, what really matters, and how to handle the negotiation phase so you can keep your sale on track.

The first thing to do is sort through the findings. An inspector’s job is to flag everything, from a loose doorknob to a major structural red flag. Your job is to sift through it all and figure out what actually needs your attention.
Decoding the Inspector’s Findings
Most reports are long, filled with photos and technical jargon that can make your head spin. Don’t let the sheer volume of information overwhelm you. The trick is learning to separate the big-ticket items from the small stuff.
I find it helpful to group the findings into three buckets:
- Major Safety and Structural Issues: These are the potential deal-breakers. We’re talking about things like an active roof leak, foundation cracks, an outdated electrical panel known for fire risk, or visible mold. These are the items that will almost certainly require a serious conversation.
- Systems Nearing End of Life: An inspector will always note if your HVAC system is 20 years old or if the water heater is showing its age. They might work just fine right now, but a buyer sees these as big-ticket expenses looming on the horizon.
- Minor Fixes and Cosmetic Flaws: This bucket includes everything else—a cracked outlet cover, a dripping faucet, some peeling paint. These are typically easy, inexpensive fixes and are far less likely to derail a deal unless there are dozens of them, suggesting deferred maintenance.
The key is to focus on health, safety, and major functional components. You’re not obligated to fix every little cosmetic issue, but you should be ready to talk about anything that affects the home’s core integrity or poses a genuine safety risk.
Once you’ve sorted the issues, you can start to anticipate what the buyer might ask for. They’ll likely come back with a list of repair requests or ask for a credit at closing. This is a completely normal part of the process—it’s just the start of the final negotiation.
Crafting Your Negotiation Strategy
How you respond to the buyer’s requests is one of the last major hurdles before closing. You have a few ways to play it, and the right move really depends on the severity of the issue, the current market, and your own situation. A little preparation here can make a huge difference.
Here are the three main ways you can respond to repair requests:
- Agree to Make the Repairs: For critical issues, especially those tied to safety or building codes, handling the repair yourself is often the cleanest path forward. It gives the buyer peace of mind. Just be sure to use a licensed professional and keep all the receipts to prove the work was done right.
- Offer a Seller Credit: Instead of dealing with contractors, you can offer the buyer a credit at closing to cover the cost of a repair. For example, if a new water heater costs $1,500, you might offer a credit for that amount. Buyers often prefer this because they can choose their own contractor and oversee the work themselves.
- Negotiate or Decline the Request: If a request feels unreasonable or is purely cosmetic, you have the right to say no. You could also offer to split the cost or suggest a small price reduction as a compromise. In a hot seller’s market, you’ll have a lot more leverage to stand firm on minor items.
Let’s look at a real-world scenario. The inspection flags an old electrical panel that’s a known fire hazard. The buyer, understandably, requests that you replace it before closing.
This is a clear safety issue, not a cosmetic flaw. Your best bet is to either get a quote from a licensed electrician and replace it or offer a credit that fully covers the estimated cost. Trying to ignore a major safety concern is one of the fastest ways to kill a deal.
Ultimately, a successful negotiation is about finding a fair middle ground. By understanding the report, focusing on what truly matters, and keeping the lines of communication open, you can navigate this final step and move confidently toward closing day.
Common Home Inspection Questions Answered
The home inspection can feel like a black box, especially if it’s your first time selling a property. Knowing the answers to a few key questions can pull back the curtain, ease your nerves, and help you walk into the process with confidence. Let’s tackle the concerns that come up again and again.
Should I Be Present During the Home Inspection?
This is easily one of the most common questions, and the answer from most professionals is a firm but polite “no.” Sellers should plan on leaving the property while the inspection is happening. This isn’t personal—it’s about giving the buyer and their inspector the space they need.
The buyer hired that inspector to get an unfiltered, objective opinion on the home’s condition. They need to feel comfortable asking blunt questions and looking into every nook and cranny without worrying they might offend you. Your presence, no matter how well-intentioned, can create an awkward vibe that stifles important conversations.
The best approach? Make yourself available by phone. Let your agent know they can reach you if a specific question pops up that only you can answer. Plan on being out of the house for about two to four hours, the typical window for a standard home inspection.
What Happens If a Major Problem Is Found?
Hearing that your home has a significant issue—like a crack in the foundation or signs of mold—is enough to make any seller’s stomach drop. But it’s rarely an automatic deal-killer. More often, it’s just the start of a negotiation.
The first step is to understand the true scope and cost of the issue. This usually means calling in a specialist, whether it’s a structural engineer for the foundation or a mold remediation company for a detailed quote. With that information in hand, the conversation can begin.
A major issue doesn’t have to torpedo the sale. It’s an opportunity for a practical, solutions-focused discussion with the buyer. The goal is to find a fair resolution that lets everyone move forward.
When a big problem surfaces, the negotiation typically heads down one of three paths:
- You Fix It: The buyer might ask you to have the problem repaired by a professional before closing.
- You Offer a Credit: You could offer the buyer a credit at closing to cover the estimated cost of the repair.
- You Lower the Price: A straightforward reduction in the sale price can compensate the buyer for taking on the future expense.
Of course, if the problem is just too big or you can’t find common ground, the buyer may have the option to walk away, depending on the inspection contingency in their offer.
What Should a Buyer Focus On During an Inspection?
While the inspector is the expert, the buyer’s job is to be a sponge. This is their single best opportunity to get a hands-on tour of their potential new home and see how all its systems work.
As a buyer, you’ll want to shadow the inspector, listen closely, and ask questions. It’s easy to get distracted by cosmetic flaws like scuffed paint, but your focus should be on the big-ticket items—the things that are expensive to fix or replace.
Key areas for a buyer to zero in on:
- Roof Condition: Ask about its age, visible wear, and any history of leaks.
- Major Systems: Get a feel for the age and performance of the HVAC, plumbing, and electrical systems.
- Water Intrusion: Pay special attention to any signs of moisture in the basement, attic, or crawlspace.
- Home Maintenance: Use the time to learn where critical things are, like the main water shut-off valve.
Are Specialized Inspections Necessary?
Absolutely. In many situations, the standard home inspection is just the starting point. Depending on the property’s location, age, and specific features, you may need a specialist to dig deeper.
Think of these as add-ons that target specific risks.
- Pest and Termite Inspections: Crucial for identifying wood-destroying insects that can cause silent but serious damage.
- Radon Testing: A smart move in areas known for high radon levels, a naturally occurring radioactive gas.
- Sewer Scope: A camera is fed down the main sewer line to check for tree roots, cracks, or blockages before they become a major headache.
- Well and Septic Inspections: An absolute must for rural properties not connected to city water and sewer.
- Chimney Inspections: If there’s a fireplace, you need to know it’s safe to operate.
Your real estate agent and home inspector are your best guides for deciding which of these specialized checks make sense for the home you’re looking at.
Navigating the inspection process is much easier with an expert on your side. For a thorough, professional evaluation that gives you a clear and actionable report, trust the certified team at Upchurch Inspection. Schedule your Memphis-area home inspection today.